Showing posts with label avocado. Show all posts

Monday, May 6, 2013

Open-Face Smoky Sweet Potato Burgers with Roasted Garlic "Cream" & Avocado

Sweet potatoes are not my favorite.

So when a friend of mine asked if I would try out a recipe for her, my gut instinct was to say "no, I don't really do sweet potatoes."  But that would make me a total hypocrite in the eyes of my son.  Almost every night at dinner, we talk about how our tastebuds are always changing.  Which makes it really important that we keep trying new things, and even re-trying old things that we didn't like before.  There are a number of foods that I hated as a child but looooooooooooove now.

So how could I, in good conscience, tell my friend "thanks, but no thanks."  I couldn't.

Dang it.


Thank you GOD for giving me a conscience.  Because otherwise I would never have known how FREAKING INCREDIBLE these burgers are.

Open Face Smoky Sweet Potato Burgers with Roasted Garlic "Cream" & Avocado
Recipe slightly adapted from How Sweet It Is
Prep time: 20 minutes   Cook time: 10 minutes

For the "cream" sauce:
1 bulb of roasted garlic
2/3 cup plain Greek yogurt [You can use sour cream if the thought of yogurt makes you cringe]
1 tsp maple syrup
Salt and freshly ground black pepper

For the burgers:
2 large sweet potatoes
1 cup cannellini beans (rinsed and drained if canned)
2 garlic cloves, minced
1/3 cup Panko bread crumbs
1/3 cup quick-cooking oats
1 large egg, lightly beaten
1 1/2 tsp smoked paprika
1 tsp onion powder
1 tsp salt
1/2 tsp pepper
1/4 tsp cumin
2-3 tbsp extra-virgin olive oil


For sandwich assembly:
1 avocado, sliced
4 thick slices whole wheat bread

1.  Preheat oven to 375.
I went ahead and roasted 2 bulbs but only used one.


2.  To roast garlic, lop off the top 1/4 of the bulb; you want to expose as many cloves as possible.  Rub off some of the excess paper and place, cut side up, in a foil lined pan.  Drizzle the bulb with a little EVOO and let sit for 10 minutes.  Cover the pan (or ball up the foil around the bulb) and roast for 45 minutes; let cool.
Roasted Garlic = Garlic Candy


3.  Squeeze out the cooled garlic cloves into a bowl and mash up with a fork.  Add in the yogurt, maple syrup, salt, and pepper.  Mix to combine and set aside until ready to use.
If you don't like garlic chunks than zip this through the food processor.


3.  Pierce the potatoes all over with a fork and place in the microwave.  If you have a Potato button on your microwave, fabulous!  If not, microwave on High for about 10 minutes, flipping over halfway through.  Remove the cooked potatoes from the microwave, slice in half and let cool until you can scoop out the flesh.
Two big potatoes makes 4 MASSIVE burgers


4.  In a large bowl, coarsely mash beans with a fork. Add in sweet potato and mash together, then add in spices, salt and pepper, minced garlic, egg, panko and oats. Mix together until combined, then place bowl in the fridge for at least 15-20 minutes. This helps form them into patties.
Pat out the mixture and score with your hand to make fairly even patties.


5.  Heat a large skillet over medium heat and add 2 tbsp olive oil. Remove mixture from fridge and form into 4 equal patties, then place in the skillet once hot. Since the mixture can be wet and messy, do not move until they are fully cooked and golden on one side! This takes about 5-6 minutes. Then, add more oil if needed (this really helps cook them) and flip burgers very gently. Cook for another 5-6 minutes.
Betcha I could freeze these at this point to cook up later.
WOO HOO for a Get Ahead moment!!


6.  To assemble, smear a healthy amount of the "cream" sauce on the toasted bread.  Top with the burger and fan out some avocado sliced on top.

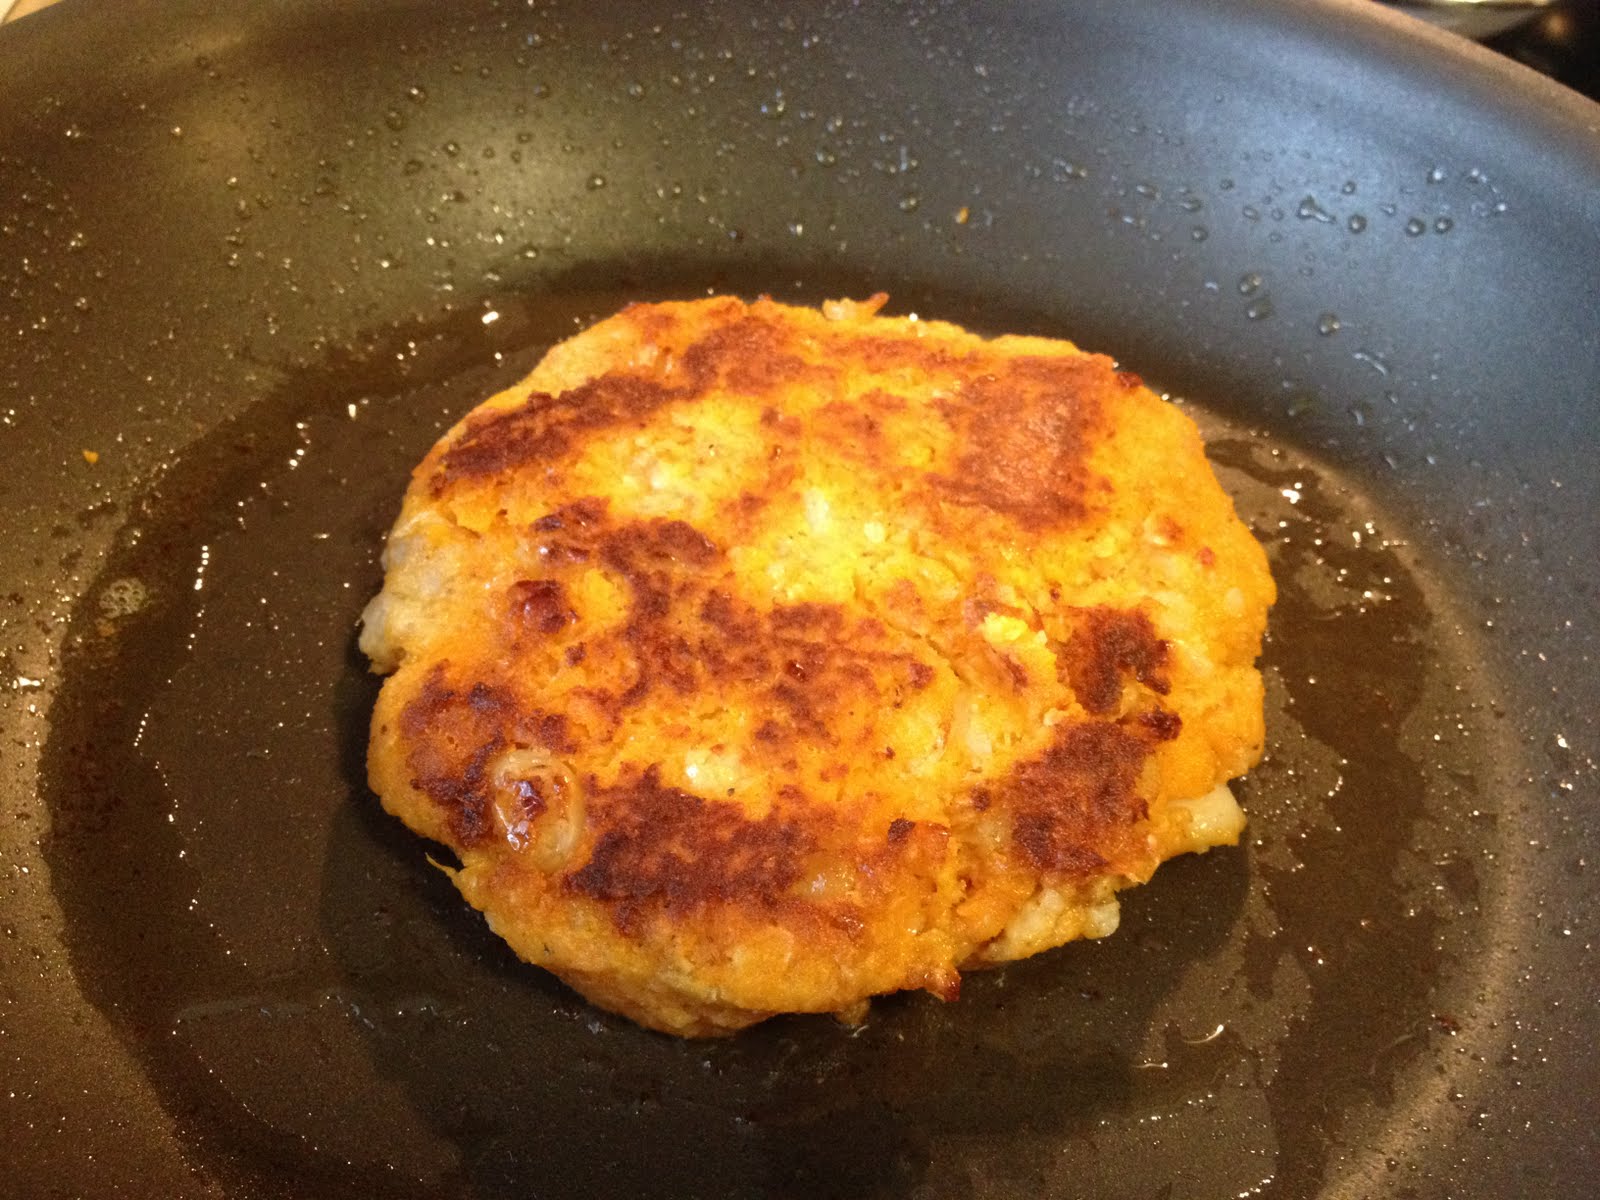
You want some good heat to get that yummy, dark crust.
But not so high that the outside burns while the inside is still cool.

As I type up this post now, I am shoveling the last leftover burger into my mouth as fast as my taste buds can handle it.  These. Are. AWESOME!!!  I used a 1/2 sharp, 1/2 sweet paprika for some really good flavor, and plenty of good quality cumin.  The natural sweetness of the sweet potato helps balance out all the spices so it's not too savory, not too sweet.  With that sharp, sweetness of the roasted garlic in the yogurt "cream" sauce, and buttery mellowness of the avocado, you get this amazing contrast of flavors just exploding in your mouth. 

I dare you to eat these and NOT fall in love.  Your taste buds will thank me later. ;)
Pin It

Monday, July 9, 2012

Chicken Taco Pizza

I've been tormenting my friends by talking about this pizza A LOT since my mom made it for me a couple weeks ago.


No more teasing... here's the recipe. Enjoy!!

Chicken Taco Pizza
Recipe adapted from Aaron McCargo, Jr.
Prep time: 15 minutes   Cook time: 15 minutes

For the Taco Seasoning:
1 tbsp onion powder
1 tbsp garlic powder
1/2 tbsp chili powder
1/2 tsp dried oregano
1/2 tsp cayenne pepper
1/2 tsp ground cumin
1/2 tbsp Kosher salt
1/2 tbsp freshly ground black pepper

For the Pizza:
1/4 cup canola oil, plus more for brushing
2 skinless, boneless chicken breasts
1/2 of pizza dough recipe  [NOTE: I used water instead of beer this time; 1 tsp garlic powder and 3/4 tsp oregano for the seasoning.  I wanted to keep the crust flavor really mild for this pizza.  I wrapped the other half of the dough and stuck in the freezer for another day.]
All-purpose flour, for dusting
1/4 cup shredded mozzarella
1/4 cup shredded sharp cheddar
Guacamole (see recipe below)
Salsa
Sour cream
Fresh cilantro, optional 

For the guacamole:
1 avocado
Juice of 1 lime
1/2 tsp ground cumin
1/2 tsp chili powder
1 tbsp diced red onion [NOTE: I used white onion this time because I forgot to buy a red one]
Kosher salt and freshly ground black pepper 


1.  Preheat a pizza stone or upside cookie sheet in the oven at 425. 

2.  Make the taco seasoning: combine all ingredients in a small bowl.
Makes a TON!  Store the leftovers in an airtight container.


3.  Prepare the pizza: season both sides of the chicken breasts with some of the taco seasoning (I used about 2 tsp total).  If you have the time, set the seasoned chicken aside about 30 minutes to marinade.  If you don't have the time, I promise it still tastes good.
Be generous with the seasonings.


4.  Preheat a grill pan or skillet over medium high heat.  Cook the chicken until cooked through, about 4 minutes per side.  Let cool, then cut into bite-size pieces.
Always, always, ALWAYS let meat rest a bit before cutting.


5.  Roll out the dough on a floured surface. Brush with canola oil and sprinkle with taco seasoning. Mix the cheeses in a bowl, then sprinkle on the crusts and top with the chicken. Bake the pizza on the hot pizza stone until the crust is golden brown, about 12-15 minutes.


I used about 1 1/2 of the chopped chicken breasts.


6.  While the pizza bakes, mix the avocado, lime juice, cumin, chili powder, red onion, and salt and pepper to taste. Top the pizzas with the guacamole, salsa, sour cream and cilantro, if using.
Love love LOOOOOOVE the chili powder in this guac!!


If you want a smokier flavor, by all means follow the original recipe and grill this beauty!  But if your Grill Master is unavailable, I don't think that should stop you from enjoying the amazingness of this pizza.

Not gonna lie... when I made this on Friday I ate half the pizza.  I'm not ashamed.  It's just TOO GOOD.
Pin It

Monday, June 27, 2011

Cobb Salad

Did you have a chance to cook up some chicken over the weekend?  If you did, I highly recommend using some of it in this:

Cobb Salad
Recipe adapted from what I've heard and AllRecipes

Lettuce
1 1/2 pints of grape tomatoes, halved
1 to 1 1/2 cups cooked chicken, cubed
5 slices of bacon
2 avocados, cubed and tossed in a little lemon juice
3 hard boiled eggs, quartered
Salt and freshly ground black pepper

1.  Preheat oven to 400.  Spread out bacon on a broiler pan and bake until bacon is crisp, around 20 minutes.  Drain what little grease there is on a paper towel-lined plate and chop after cooled.


2.  Spread lettuce out on a large platter.
Beautiful lettuce I picked up at the farmer's market


3.  Lay out remaining ingredients across lettuce, each in their own section.
Normally I like a tossed salad, but this just turned out gorgeous!


4.  Season to taste with salt and pepper

Use whichever dressing you prefer, but a simple red wine vinegar and extra-virgin olive oil is fantastic!  This salad actually turned out better that I could have expected for our family to eat for dinner.  Because I kept the toppings segregated, we were each able to take from the sections we preferred.  Since Gavin has become quite the selective eater in the last couple years, this made dinner suddenly more normal, instead of the battle that it usually is.  Gotta love that!

Oh yeah...Cobb salad usually has a section of bleu cheese but I didn't have any handy, plus I ran out of room on the platter anyway.  Obviously next time I need to use a bigger one! :)
Pin It

Monday, June 13, 2011

Warm Tomato-Corn Salad

I'm not really sure what Mother Nature's issue is, but clearly she's hormonal about something.  One day it's hot, the next it's 30 degrees cooler.  At 8:00 a.m. the sun is blazing but by 10:46 there's a downpour.  Wha???

You know what?  Mother Nature can have her tantrums.  I'm going to make my own warm sunshine in my kitchen, starting with this salad.
No one will ever know if you lick the monitor. ;)


Warm Tomato-Corn Salad
Recipe adapted from So Easy

2 tsp extra-virgin olive oil
3 green onions, chopped with the green and white parts divided
2-3 cloves garlic, minced
2 pints grape tomatoes, halved
2 cups frozen corn (or if you use fresh off the cob, you'll want about 4 ears of corn)
Salt and pepper
3 tbsp lime juice
3 tbsp cilantro, finely chopped
1-2 avocados, chopped

1.  Heat EVOO in a large skillet over medium-high heat.  Add the white parts of the onions and saute a few minutes, until softened.  Add the garlic and cook another minute, being careful to just brown the garlic, not burn it.
I used the white and pale green parts to saute first.


2.  Add the tomatoes and corn to the skillet and let cook about 3 minutes, until softened but they still retain their shape.  Stir in the green parts of the onion.  Turn off the heat and season with salt and pepper.
The color in this salad is fantastic!


3. In a small bowl, whisk together the lime juice and cilantro.  Drizzle over the tomato mixture and toss to combine.  Serve the warm salad topped with chopped avocado.
Yummy yum yum


No longer does a salad need to be served cold with watery lettuce!  It can be warm.  It can be happy.  It can make you do a little dance around the kitchen!  No?  That's just me?  Well, ok.  But try this first and then tell me you're not dancing for summery joy, no matter what Mother Nature decides to do that day.
Pin It

Wednesday, April 27, 2011

California Club Sandwich

Have you ever watched one of those cooking shows and the person is explaining how they were inspired to make this particular (complicated) dish based on something they ate recently and some restaurant in a far-off city that normal people like you and me will never visit?  Yeah, me too.  I hate it when they do that.  I feel like I have no creativity when they do that because I'm soooo dependent on recipes.

And now I'm about to do it to you.  Crud.  Forgive me?

I have to say though that I wasn't "inspired" by a dish I actually ate; I flat-out wanted to duplicate a sandwich I saw listed on the menu.... and based on the description, which was essentially the ingredient list, I thought I could do it.  And if not, hey, there's bacon involved so it can't be that bad, right?


Honestly, because I didn't order the sandwich I have no idea if I succeeded in my duplication efforts or not.  Quite frankly I don't really care.  What I came up with is SO GOOD, I'm just going to keep making it as is.  So there.

California Chicken Club Sandwich
Recipe inspired by Bar Louie menu item


4 boneless, skinless chicken breast cutlets
1 yellow onion, cut into 1/4" thick slices
Extra virgin olive oil
Salt and freshly ground black pepper
2 ripe avocados
Lemon juice
2 tomatoes, sliced
1/2 lb thick-cut bacon, cut in half and baked in the oven (baked bacon doesn't crinkle as much and is easier to eat in a sandwich)
4 slices pepperjack cheese
1/4 cup (ish) Ranch dressing
Multi-grain sandwich bread

1.  Preheat broiler.  Lay the chicken cutlets and onion slices on a broiler pan.  Drizzle both sides of everything with extra-virgin olive oil and season with salt and pepper.  Broil about 6 minutes per side until onions are soft and chicken is cooked through.  NOTE: this step would be AWESOME on the grill!
I used a little Rosemary oil, just for an added flavor boost

2.  Because sliced avocado can be slippery (as are several other components to this sandwich), I decided to smash mine up with a little bit of lemon juice and salt.  I purposely left it pretty chunky though so it wouldn't feel like an "avocado spread."
I could've just had this for dinner and been deliriously happy

3.  Toast 8 slices of multi-grain bread.

4.  Rob and I each assembled our sandwiches a little differently.  I liked:
  • Bottom toast, spread a little Ranch dressing
  • A few pieces of onion
  • Chicken cutlet
  • 3-4 pieces of bacon
  • Pepperjack cheese; toss under broiler for a few seconds to melt the cheese slightly
  • 2 slices tomato
  • Healthy dollops of avocado
  • Top toast
Yes, I had to unhinge my jaw a little to eat this.  WORTH IT!!
The leftovers did not even last 24 hours.  Are we surprised by this?  Nope!
    Pin It

    Thursday, April 14, 2011

    BLT's with Beer Bread and Guacamole

    I really don't have the time or energy anymore to keep up with cooking shows like I used to.  When Gavin was a baby (and before he was born too) I would watch Food Network on Saturday mornings the way most kids watch cartoons.  I love all the great ideas!

    Nowadays I'm lucky if I can get a foodie magazine read before the next issue comes along.  But I do have one guilty Food Network pleasure that consistently pops up on the DVR: Diners, Drive-ins, & Dives.

    This isn't really a cooking show; it's a guy touring the U.S. checking out funky, unique restaurants and sampling some of their most popular dishes.  And most of the time he'll learn how to make those dishes too.  I have found that I get some of the best ideas from watching what other creative chefs are doing, like this one.

    BLT's on Beer Bread with Guacamole
    Inspired by a restaurant that I cannot for the life of me remember on Diners, Drive-Ins, & Dives. 

    1 lb bacon
    Mayonnaise
    Sliced tomato
    Leaf lettuce

    For the bread:
    12 oz warm beer
    3 cups all-purpose flour
    1 tsp salt
    2 tbsp dark brown sugar OR honey
    1 packet OR 2 1/4 tsp active dry yeast

    For the guacamole:
    2-3 ripe avocados
    1 small tomato, seeded and chopped
    1/2 small onion, finely chopped
    1-2 cloves garlic, minced
    Juice of one lemon

    1.  To put together the bread, add all ingredients to the breadmaker according to manufacturer's instructions.  Bake using the white bread setting.  Let cool at least 1 hour before slicing.
    A little dense but really good flavor!
    2.  To put together the guacamole, cut the avocados in half and spoon the flesh into a bowl (remove the big seed either with a spoon or knife).  Add the remaining ingredients, plus a good pinch of salt.  Mash together with a fork.  For an extra kick toss in a seeded, finely chopped jalapeno.
    No, I don't use conventional guac ingredients... and I don't care! ;)
    3.  Preheat oven to 400.  Cut strips of bacon in half and lay on a baking sheet.  Bake for about 20 minutes (when you can smell it, it's probably just about done).  Drain on a paper towel-lined plate.
    I prefer the anti-stovetop-splatter method
    See? Crispy bacon WITHOUT the grease stains or burned fingers!


    4.  Assembly!  Toast 2 slices of beer bread.  Spread some mayonnaise on the bottom piece of toast.  Layer on a generous helping of bacon, lettuce, and sliced tomato.  On the top piece of toast spread a generous amount of guacamole (1/4 cup worth?).  Slice the sandwich in two and enjoy with kettle chips.
    Commence drooling in 3...2....


    This is how I put together this sandwich.  Do you have a bakery close by that you love and makes awesome beer bread?  Use that!  Have your own spectacular guacamole recipe?  Go for it!  My own sandwich did not use the restaurant's recipes at all....I just intensely desired to make my own version once I saw how deliciously yummy theirs looked.  And I have to say that even though I ate this beauty only a few days ago now, I'm already craving it again!
    Pin It