Sunday, October 30, 2011

Rosemary Pork Tenderloin

The other night, as this was baking and the glorious aroma of it was scenting the air, I made an off-hand comment about this dish being a meat log covered in meat.

Really, that pretty much sums it up.  If you like Pig, you'll LOVE this.

Rosemary Pork Tenderloin
Recipe slightly adapted from Claire Robinson

1/3 cup Dijon mustard
1-2 tsp freshly ground black pepper
1 tbsp chopped fresh rosemary leaves, PLUS 4 sprigs rosemary, with hard woody stems
5 large garlic cloves: 2 cloves minced, 3 cloves smashed
2 pork tenderloins, about 1-pound each
6-ish slices bacon, cut in half

1.  In a small bowl, whisk together the Dijon mustard, fresh ground black pepper, chopped rosemary, and minced garlic and mix well. Rub the mustard mixture over the surface of the tenderloins and wrap in plastic wrap. Marinate in the refrigerator at least 1 hour (I marinated mine for close to 6 hours). 
Simple ingredients. Strong flavors.


2.  Preheat oven to 375 degrees F. 
The bed for the tenderloins


3.  Place rosemary sprigs and smashed garlic in the center of a baking dish. Remove the plastic wrap from the tenderloins and top each with slices of bacon. 
Tucked in with a bacon blanket


4.  Place the baking dish in the oven and bake for 25 to 30 minutes or until an instant-read thermometer, inserted in the tenderloins, registers 160 degrees F. Remove from oven when desired doneness is reached and let sit for 5 to 10 minutes on a cutting board before slicing.
Took this pic with my phone.  Not too shabby!


Yup, a log of tender pork, covered in a bacon blanket.  I don't think it gets any better than that!
Pin It

Wednesday, October 26, 2011

Meatloaf Muffins with Barbecue Sauce

I had a lot of comforting ideals when it came to food when Rob and I first got married.  Some became family favorites.  Others were shot down.  One that I fully expected to make periodically was the always classic meatloaf.

And then I was informed that my other half does not like meatloaf.

I don't really recall all the details of my reaction, but I know I was willing to accept the loss of tuna casserole.  And though it pained me, I'd manage without my beloved linguine with clam sauce.  But you know what?  A girl's gotta draw the line somewhere, and I decided that line was meatloaf.  Because when you think about it, my husband is a diehard Carnivore.  There is no reason why he should not like meatloaf!

My investigation began to find some means of getting that comforting flavor that I loved from my childhood but using ingredients that Rob couldn't say no to.

Ladies and gentleman, we have a winner!

Meatloaf Muffins with Barbecue Sauce
Recipe adapted from Rachael Ray

1 lb lean ground beef
1 medium onion, cut into chunks
3 small-medium carrots, cut into chunks
1 large egg plus a splash of milk, beaten
1 cup plain breadcrumbs
2 tbsp grill seasoning
1 cup smoky barbecue sauce
1/2 cup salsa
1 tbsp Worcestershire sauce
Extra-virgin olive oil

1.  Preheat oven to 450. 

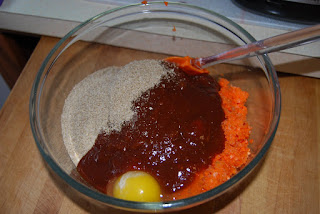
2.  Put ground beef in a large bowl. In a food processor, add onion and carrots. Pulse until finely chopped and add them to meat bowl. Add egg (beaten with a splash of milk), breadcrumbs and grill seasoning. 
There really is meat under all that goodness!


3.  Next, in a small bowl mix together barbecue sauce, salsa and Worcestershire sauce. Pour half the sauce mixture into the meat bowl. 
Not your typical ketchup topping


4.  Mix meatloaf together with your hands.  Even out the meat in the bowl and score it, with your hand, into four sections.  Lightly roll each section into three balls.
I think these are rather cute


5.  Brush a 12-cup muffin tin with oil. Place a ball into each cup and pat down a little.  Top each meatloaf muffin with remaining sauce.  Bake about 20-25 minutes. 
Salsa and bbq sauce give this a deeper, almost meatier flavor


Not only does Rob really go for this, but I've grown to love it more than the ketchup-topped version I grew up with.  Bonus reason why I like this recipe?  Because it's divvied up into smaller portions, it bakes significantly faster then a standard loaf.  I love to serve this with cream cheese mashed potatoes and either green beans or a tossed salad.

Pin It

Monday, October 24, 2011

Pretzel-Cheddar Crusted Chicken

I really do like pretzels.  I do!  I just don't love the gigantic bags they typically come in.  I swear that whenever I buy pretzels I end up throwing out half of them because they've gone stale waiting on us to snack on them.

It PAINS me to throw out food.  Physically pains me.  I mean, why not just take the money and throw it in the garbage instead??

Pretzels are such a common snack food; is there anything else I can do with these before they go stale???

Yep.

Pretzel-Cheddar Crusted Chicken
Recipe adapted from Rachael Ray
 
Four 5-ounce skinless, boneless chicken breast
1/2 cup salted baby pretzels 
1/2 cup plain bread crumbs 
1/2 cup shredded or crumbled sharp cheddar cheese 
1 tablespoon fresh thyme, chopped 
1/8 teaspoon freshly grated nutmeg (eyeball it) 
Freshly ground pepper 
1 large egg 
All-purpose flour, for dredging 
Canola oil, for frying 
Salt

1.  Place 1 chicken breast on the center of a large piece of plastic wrap.  Cover and, using a heavy-bottomed pot or meat mallet, pound each breast until evenly thin.
I think my chicken breasts were about 1/4" thick


2.  Place the pretzels, bread crumbs, cheese, thyme, nutmeg and pepper in a food processor and pulse to grind until they’re the consistency of bread crumbs. Transfer the pretzel mixture to a shallow dish.
Simple, yet different, breading ingredients


3.  Crack the egg into a second shallow dish and lightly beat with a splash of water. Place some flour in a third dish. Coat the chicken first in flour, then egg and finally in cheese and pretzel crumbs. 
I did not measure the oil; just cover the bottom with a good amount.
Shallow frying, not deep frying.


4.  In a large skillet, heat 1/4 inch of oil over medium-high heat and add the coated chicken breasts. Cook in a single layer, 3 or 4 minutes on each side, until the juices run clear and the breading is evenly browned. Cut off a piece of a cutlet and taste, to see if you want to salt them a little.
The answer to Gavin's request for "crispy chicken."

FYI, this recipe is FANTASTIC with some warm, chunky apple sauce. ;) If you don't have any jarred sauce, or apples to make a quick homemade sauce, then some mixed veggies and brown rolls work just as well with this dish.

Pin It

Friday, October 21, 2011

Chicken Parm Casserole

I started this blog because people seemed really curious about my cooking.  Either they were curious about what I was putting together that night (and usually wanting the recipe), OR they were asking how I managed to make home-cooked meals almost every night of the week.  I don't know about you but I'm having a good time with this!

Keeping up with the blog though has kind of had an unexpected effect on me.  I'm getting more and more urges to make things without a plan, without a recipe. It's seriously becoming almost like a game!  I deliberately leave a night's dinner unplanned and wander the grocery store to see what's on sale, what catches my eye. 

This dish came about because, while picking up some goat cheese, I glanced up to see fresh mozzarella on sale.  Mmmmm....fresh mozzarella....  The first thing that jumped in my mind was Chicken Parmesan.  But I didn't really want to make the pasta and sauce, bread and bake the chicken, .... it just felt like too many separate components and more than I felt like tackling.  If only I could have that same flavor but all mixed up as one dish.  Like a casserole or something.

Wait a minute....

Chicken Parm Casserole

2 bone-in, skin-on chicken breasts
1 jar spaghetti or marinara sauce
1 lb whole wheat thin spaghetti
1 cup reserved pasta water
1/2 lb fresh mozzarella, cubed
1/2 cup Panko bread crumbs
1 tsp dried oregano
2 tbsp grated Parmesan
2 tbsp grated Asiago (optional)
Extra-virgin olive oil


1.  Preheat oven to 350.  Bring a large pot of salted water to boil an cook spaghetti according to package directions, under cooking it by about a minute (don't worry, the pasta will finish cooking as the casserole bakes).
The bones and skin keep the meat moist and flavorful. 
You can use boneless, skinless though; just cook for 10-15 minutes instead.


2.  In a large skillet, heat the marinara sauce over medium heat.  Add the chicken breasts and spoon a little sauce over the top.  Cover and let simmer about 20 minutes, or until cooked through.  Turn off the heat, remove the chicken breasts from the sauce and LET REST for 10 minutes before shredding the meat.
Partially freezing mozzarella makes it easier to cut or shred.


3.  Return the shredded meat to the marinara sauce, along with the with the mozzarella and cooked spaghetti.  Toss to combine.  If the sauce gets too thick, use some of the reserved pasta water to thin it out.  (Remember, this is going into the oven and the moisture will be absorbed as it bakes.  You want a thinner sauce at this point.)  Pour into a lightly greased 9x13 baking dish.
Or get ahead by putting into 2 8x8 pans and freezing one for later.
Wait on the topping until the night you bake it.


4.  For the topping, toss together the Panko, oregano, Parmesan, and Asiago (if using).  Sprinkle over the top of the casserole and drizzle with a little EVOO.  Cover with foil and bake for 20 minutes.  Remove foil and bake another 10-15 minutes, until top is golden and sauce/cheese is bubbly yumminess.

Creamy. Crunchy. Comforting.
This dish had all of the flavors and much of the texture of a traditional Chicken Parmesan dish.  I just wanted to give it a little bit of spin.  Actually, this would be a FANTASTIC way to use up leftovers!  Some extra pasta in the fridge, some rotisserie chicken,...you see where this is going?  With leftovers, this could seriously become a 30 minute, post-long-work-day meal.  Add a tossed salad and some garlic bread and you are set!


PSST!!  Not into eating meat?  Use grilled eggplant or zucchini instead of chicken. ;)
Pin It

Thursday, October 20, 2011

Cranberry Zucchini Bread

It's Fall.  That means cranberries, apples, and gourds are plentiful.  Oh how I LOVE the smells of fruits and vegetables roasting, baking, cooking away!! Thanks to a friend, I got my hands on 5 lbs of fresh cranberries.  Do you know how much 5 lbs of cranberries is?  It's about 19 cups, give or take.  Yeah, that's a lot.

But I'm good with a lot.  That's when I get to gleefully make recipes like these.

Thankfully, this recipe makes two loaves.  I made this on Sunday and one loaf is already gone.  We're actually halfway through the second.

Yup, it's a worthy recipe to welcome Fall.

Cranberry Zucchini Bread
Recipe adapted from AllRecipes

3 cups all-purpose flour
2 cups sugar
2 1/2 tsp ground cinnamon
1 1/4 tsp salt
1 tsp baking soda
1/2 tsp baking powder
1/4 tsp ground nutmeg
3 eggs
1 1/2 cups shredded zucchini
1/2 cup vegetable oil
1/2 cup unsweetened applesauce
1 tbsp vanilla extract
2 cups chopped fresh or frozen cranberries
1/2 cup chopped walnuts

1.  Preheat oven to 350.  In a large bowl, combine the first seven ingredients.  
Great way to use up the last of your garden's zucchini


2.  In another bowl, beat eggs; add zucchini, oil and vanilla. Stir into dry ingredients just until blended. Fold in the cranberries and walnuts. 
Yeah, I forgot to chop the berries.  I'll remember next time.


3.  Pour into two greased and floured 9-in. x 5-in. x 3-in. loaf pans. Bake at 350 degrees for 50-60 minutes or until a toothpick inserted near the center comes out clean. Cool for 10 minutes before removing from pans to wire racks. 

Your house will smell like Thanksgiving while these are baking!

Pin It

Monday, October 17, 2011

Greek Taco

A little while ago a friend was wondering aloud what on earth she was going to do with all the cucumbers that had exploded out of her garden.  And being the helpful person that I am, I went digging around online for recipes.  This one looked so good I couldn't resist taking the extra step of testing it for her first.

You know, for the sake of our friendship..... ;)

WARNING: Do NOT freak out at the length of the ingredient list!  There are several components to this dish, but each is easy and FAST to put together.  And I'm willing to bet you have just about everything in your pantry or fridge anyway.

Greek Tacos
Recipe adapted from Jeff Mauro

For the relish: 
1 tbsp extra-virgin olive oil
 
1 tbsp red wine vinegar

2 firm tomatoes, seeded and diced

1 cucumber, seeded and diced

1/2 onion, diced

Freshly ground black pepper


For the tzatziki:
1 cucumber, seeded and chopped
Salt
1 cup whole-milk Greek yogurt
1/2 cup crumbled feta cheese
1 clove garlic, minced or pressed


For the meat:
1 lb lean ground beef
Kosher salt and freshly ground black pepper
1/2 onion, minced
1 tsp dried oregano
4 cloves garlic, minced
1 tbsp tomato paste [Don't want to waste a whole can? Get tomato powder and mix in a little water]
2 tbsp dry red wine

Also don't forget:

4 flour tortillas

1.  For the relish: Toss the olive oil, vinegar, tomatoes, cucumbers and onions in a bowl and adjust the seasoning if necessary. Cover and let sit at least 1 hour to marry the flavors. 
Need a reason to use up excessive garden goodness?  Now you have one.


2.  For the tzatziki: Grate the cucumber on the large holes of a box grater and place in a fine-meshed strainer or cheese cloth fitted over a bowl. Salt the cucumber and let sit 10 minutes. Then squeeze out any excess moisture. Add the strained cucumber into a bowl with the yogurt, feta, and garlic. Adjust the seasoning if necessary. 
Love, love, LOVE fresh garlic and onion


3.  For the meat: Heat a large skillet over medium-high heat. Add the beef, sprinkle with salt and pepper and cook until the meat gets nice and golden brown, 10 to 12 minutes. With a slotted spoon, remove the beef and reserve. Lower the heat to medium and saute the onions in the meat juices until soft, about 5 minutes. Add the oregano and garlic and cook until fragrant. Season. Add the tomato paste and cook until it caramelizes. Deglaze with the red wine and scrape any bits up that have adhered to the pan. Add the beef back in, stir and set aside.
Red wine should always be used to deglaze pans.


4.  Smear the tzatziki on the tortillas, then place on the beef mixture and top with cucumber tomato relish. Roll up and enjoy!
Prepare yourself for a flavor explosion


Pin It

Saturday, October 15, 2011

Waffles

It's been a stressful week.  Really stressful.  The kind where even though you know better than to Stress Eat, you get to that certain point where only comfort foods will do.

Yeah, that kind of a stressful week.

Now, when I think of comfort foods, some of the things that come to mind are pot roast, lasagna, great big vats of creamy soups, bread bread and more bread,....  But, I'm not in the mood for any of those things.  I don't want pot roast or lasagna or soup or bread.  I want something familiar, something from my childhood, something that makes me happy no matter what.

I want waffles.  THESE waffles.

Waffles
Recipe from, who else, my mom

2 cups flour
4 tsp. baking powder
1 tbsp. sugar
1/4 tsp. salt
2 eggs, separated
1 2/3 cups milk
6 tbsp. butter, melted
  
1.  In a small bowl, sift together flour, baking powder, sugar and salt; set aside. 
The only downside to this recipe is the need for a lot of bowls.


2.  Beat egg whites until stiff but not dry; Beat egg yolks; stir in milk and butter. Add flour mixture gradually, beating until smooth. Fold in whites. 
STIFF peaks


3.  Spoon into a preheated waffle iron and bake. 
Pardon me while I mop up the drool puddling in my lap.

 These waffles are so tasty, they're DANGEROUS.  Yup.  Because the eggs whites are beaten separately and then folded in so as not to lose that volume, you end up with a lighter, fluffier batter.  Lighter, fluffier batter makes for a lighter, fluffier waffle.  Lighter, fluffier waffles mean that I could, if I really wanted to, quite possibly eat an entire recipe's worth of these things. But that's ok, because it's been a stressful week.  And sometimes you need to eat a dozen or so waffles from your childhood to make the world a happier place.

Pin It

Monday, October 10, 2011

Thai Chicken & Butternut Squash Soup

At long last, it has finally been revealed to me why I feel compelled to own such gargantuan-sized slow cookers.

It's so I can make big batches of this soup!

Thai Chicken & Squash Soup
Recipe adapted from Kay Connelly/Weight Watchers

2 cups peeled butternut squash, cubed
2 tsp olive oil
1 1/4 lb boneless, skinless chicken breasts, cut into 1" cubes
1/2 tsp salt
2 tsp canola oil, divided
1 onion, chopped
3 garlic cloves, minced
1 tbsp grated fresh ginger
1 tsp Thai red chili paste
1 tsp ground Garam Marsala
1 (32oz) carton low-sodium chicken broth
2/3 cup light coconut milk
2 tsp packed brown sugar
1 tbsp hot curry powder

1.  Preheat oven to 400. Add squash to a Ziploc bag with 1-2 tsp olive oil and shake. Spray a baking sheet with non-stick spray and spread squash in single layer. Bake for 15 minutes, flip the pieces over, and bake another 15 minutes. 
Golden, Fall-icious color!


2.  Sprinkle chicken with salt. Heat 1 tsp oil in large nonstick skillet over medium-high heat. Add chicken and cook, stirring occasionally, until browned, about 5 minutes. Transfer chicken to 6-qt slow cooker. Heat remaining tsp oil in skillet over medium heat. Add onion, garlic, and ginger; cook, stirring occasionally, until onion is golden, 3-4 minutes. 
FYI, the smell of onion, garlic, and fresh ginger sauteing is OUT OF THIS WORLD


3.  Remove skillet from heat. Stir in chili paste and Garam Marsala . Transfer onion mixture to slow cooker. Stir in squash and broth. Cover and cook until chicken and vegetables are fork tender, 3-4 hours on HIGH or 6-8 hours on LOW. 
I would not recommend trying to find this paste with two children along.
Children have no patience for Hide & Seek: Grocery Edition.


4.  About 20 minutes before cooking time is up, stir in coconut milk, brown sugar, and hot curry powder. Cover and cook on HIGH until mixture simmers and flavors are blended, about 15 minutes. 
Creamy. Flavorful. Rich. Wonderful.

Pin It

Wednesday, October 5, 2011

Cranberry Ribs

When I think of ribs, I usually think Summertime Barbecue.  Smoke hanging rich and thick in the air.  Spicy, sweet sauce that gets everywhere.  Sticky fingers that are just begging to be licked clean.  Yeah, good times.

Oh and for the record, this recipe is not like that.

Sure it's still ribs, and there's a sauce, but these are done in a slow cooker instead of a grill or smoker.  Oh yeah...  These ribs sit in a berry bath all day in the slow cooker.  The result is meat SO TENDER that the bones just slide right out.  You could try and eat these with your hands, but I'd recommend a fork since the meat doesn't stay on the "stick", as Gavin calls it.

And my favorite part is that it doesn't have to be summer to enjoy these.

Cranberry Ribs
Recipe adapted from my brother

2 cups fresh or frozen cranberries
1/3 cup maple syrup
1/3 cup brown sugar
1/2 cup water [Psst! If your berries are still frozen then consider using only 1/3 cup]
1 Granny Smith apple, or other preferred TART apple, diced (about 1 cup)
1 tsp Dijon mustard
1/4 tsp cinnamon
1/4 tsp nutmeg
Salt and freshly ground black pepper
3 – 4 lbs. ribs
1 lg. onion, sliced
1 tbsp cornstarch mixed with 1-2 tbsp water, optional

1.  Combine cranberries, syrup, brown sugar, water and diced apple in a sauce pan. Bring to a boil then reduce heat to medium low and simmer 5 minutes.  Remove from the heat and stir in mustard, cinnamon, nutmeg, salt and pepper. 
I really enjoy making cranberry sauce. It's so EASY! Plus my house smells great.


2.  Layer onion on bottom of crock pot. Put ribs on onion and spoon sauce evenly over ribs. Cook on LOW 7 – 9 hours. 
If you can get it all to fit, try to lay the ribs fat side UP


3.  Remove ribs to a platter. Strain juices into a sauce pan. Use cornstarch mixture to thicken sauce like gravy if desired. 
Fork required, knife not necessary.  The meat melts like butter!


When I started this blog, one of the many questions I'd get about cooking is how I can make so many from-scratch recipes after working a full day.  My answer: I take my short-cuts whenever and wherever I can.  In this case, make the sauce the night before.  It's literally as simple as dumping a bunch of stuff in a pot, bring it to a boil, and then let it simmer on low a while.  Then the next morning, before you head out for the day, take the FIVE MINUTES to slice up the onion (which you could also do ahead if you like), lay the ribs on top and then pour over the sauce.
Pin It

Monday, October 3, 2011

Roasted Tomato & Black Bean Soup

I am totally on a soup kick.  The temps are starting to cool.  Leaves are turning those gorgeous jewel tones.  It's dark now when I get up and leave for the day.

These are the days I would really like to come home to a giant pot of goodness already bubbling away.  And a clean house.  And the laundry washed, folded, and put away.  Oh and a perfectly chilled glass of wine.  *sigh*  Ok, back to reality.

The reality is, with this recipe and a little thinking ahead, it comes together in about 10 minutes.  Yes, for real!

Roasted Tomato & Black Bean Soup
Recipe adapted from Ellie Krieger

7-10 medium tomatoes [I used a bunch of plum tomatoes], quartered
1 medium, or 2 small onions, quartered
3 cloves garlic
Extra virgin olive oil
Salt and freshly ground black pepper
2 cans black beans, rinsed and drained
5 cups low sodium chicken stock [Don't do meat? Use a good quality vegetable stock]
1 tsp chipotle chili powder
1 1/2 tsp cumin
1/4 tsp hot pepper sauce

1. GET AHEAD TIME: Preheat your oven to 375. On a parchment paper lined baking sheet, toss the tomatoes, quartered onions and garlic cloves in the oil, salt & pepper.  Spread out in a single layer.  Roast for 35-40 minutes, stirring once.  Cool and refrigerate, or move onto step 2 right away.
I love the garden-freshness of this pan


2. Transfer the roasted vegetable mixture to a 4-quart saucepan.  Add the stock, beans, cumin, chili powder, salt, and pepper.  Bring to a boil, reduce heat and simmer for 10 minutes.
The veggies I roasted the day before are ready for the soup pot!


3. Remove from the heat and blend until smooth with an immersion blender, or in batches in a regular blender.  Stir in the hot pepper sauce.  Garnish however you like (my boys went for sour cream and cheese).
Mmmmmmmmmmmmmmmmmmmmmm


Don't be fooled by the almost milk-chocolatey color of this soup.  This dish has some KICK!!  I'll admit I was pretty free with my "1/4 tsp" of hot pepper sauce.  And yes, I have a really good quality chili powder and didn't bother to level off my measure spoon as I scooped it out of the jar.  But even if you pay close attention to the spice amounts, this soup has heat.  And that's good!!  Between the warm smells of vegetables roasting, and this soup simmering, you want to keep that warming trend as you eat this with some really great spices.

I made some plain ol' white bread for dunking.  But a monster good grilled cheese sandwich would be fabulous as well.

Pin It