Thursday, January 31, 2013

This Week's Menu

Thank you so much for your patience!!  There have been so many recipes I want, and meant to, share with you this week but I, unfortunately, have been dealing with the Sinus Infection From Hell.  Hopefully I've got the right cocktail of drugs now and can move forward cooking, and thinking, more clearly!

Only one week left to pick out my birthday cake!!  Have you decided yet?  Still not sure?  Need a little photographic reminder of the drooliness of each of these cakes?  I need your help here!

Oh yeah.. and here's my healthier-than-chocolate-or-ice-cream-cake menu for the coming week.  Necessary, but not as much fun as cake.
  • Thursday: Lasagna, tossed salad, and garlic bread
  • Saturday: Dinner with friends!
  • Sunday: It's Super Bowl Sunday!  So of course it's all about snacks pretty much all day long.  Veggies and dip, buffalo chicken dip, chips with salsa and queso, maybe some sliders, and perhaps a New Recipe! Banana Split Brownie Pizza to top it off.
  • Monday: Red Beans & rice.  Due to sickness, I didn't make this when I last said I would... so here's Take 2!
  • Tuesday: New Recipe! Beer Cheese Soup with Garlic Butter Crostini
  • Wednesday: Leftovers
Happy planning!!
Pin It

Tuesday, January 29, 2013

Tomato Basil Quinoa Salad

I'm bored. 

Yup, as much as I cook every single day... As much as I experiment with new dishes, I. Am. BORED. 

I'm bored with our side dishes.  I'm just not that kind of person (yet) who can experiment with a new main dish while also putting together a multi-step side dish that also requires me to examine a recipe.  So I'm left with the usual Side Dish Suspects: nuking some potatoes, rice, boiling pasta, maybe mashing potatoes because that doesn't require much thought, more plain rice, my bread maker...

*yawn*

Not only am I bored with the process of making my brainless sides, I'm bored with my ingredient options.  What other kinds of starches can I play with that my family won't clearly balk at eating?


Duh Jeanna.  Grains!  And what better one to start with than quinoa?  Oh, and FYI, it's pronounced "KEEN-wa".  Not "kwi-NO-ah" as my husband likes to tease me by saying. ;)

Tomato Basil Quinoa Salad
Recipe slightly adapted from Diva Dish
Prep time: 15 minutes   Cook time (if you need to make the quinoa for this): 25 minutes

2 tbsp balsamic vinegar
1 tbsp extra virgin olive oil
1/4 tsp garlic powder
Zest of one small lemon
Salt and freshly ground black pepper
2 cups prepared quinoa [This is about 1/2 cup unprepared if you don't have leftover lying around and need to make some just for this salad]
3 1/2 cups diced tomatoes
2 cups spinach, chopped
1 cups packed basil, chopped

1. In a small bowl, whisk together the vinegar, EVOO, garlic powder, lemon zest, salt, and pepper, and set aside. 
I love balsamic dressing.  L.O.V.E.


2. In a large bowl add quinoa, tomatoes, chopped greens, and dressing. Mix until combined, and add more salt and pepper to taste.
Quinoa Before.

Quinoa After (1 cup uncooked = about 4 cups cooked)


3. Refrigerate until ready to serve.
My boys inhale tomatoes.

Basil and spinach... I think I need a bigger bowl.


I think I have a new favorite salad.  This salad is bright, lemony, and refreshing!  I love the texture of the quinoa; it's kind of like rice but has a firmer texture with a slight crunch as you chew it.  It's awesome!!  Now, if you don't like quinoa, can't find it, or can't afford it (it's a little pricey), feel free to use rice or pasta in this salad.  It'll be just as yummy!

Oh and can you imagine how good this would be at the height of tomato and basil season???  *drooling!!*

[Ok so I looked it up, and before anyone flames me let me just say that though I called quinoa a grain, it is technically a seed.  See?  I learned something new!  And I'm sharing my new-found knowledge with all of you.  Everybody wins!]
Pin It

Thursday, January 24, 2013

This Week's Menu

It's that time again!  What on earth am I making for dinner this coming week?  Gotta come up with something... although I'm getting more and more distracted by my upcoming BIRTHDAY, for which I need a CAKE.  Have you voted yet?  Please vote! ;)
  • Friday: Pizza and popcornI can't tell you how excited my kids get over this dinner every single week.
  • Saturday: New Recipe! Cashew Chicken Soup and some kind of bread
  • Tuesday: Leftovers
  • Wednesday: Date Night!!!
Happy planning!!
Pin It

Wednesday, January 23, 2013

Birthday Cake Contest!

Did you know I'm having a birthday cake contest?!  Yes way!  And it occurred to me that it's not easy to pick out a recipe based on the name alone.  So to help you help me choose a cake, I thought I'd do a post just showcasing pictures of the delectable beauties that I'm torn between.

Because they all look SO DANG INCREDIBLE that I can't decide which one I want.  So I want you to make that decision for me!

Chocolate Blackout Cake

Grasshopper Cake

Chocolate-Orange Cake with Salted Caramel
Layered Ice Cream Cake
Make the best cake win!!
Pin It

Tuesday, January 22, 2013

Whole Grain Pancakes

Remember my meal plan for this week?  Yeah, you could probably disregard that.  It's just going to be one of Those Weeks.  Because right now I have a feverish 5-year-old quietly playing with Legos in the dining room.  And I have a feverish 19-month-old spread across my lap.  And apparently the only cure for whatever my 19-month-old has is constant Mommy Contact.  Constant.  As in all the time.  Poor baby. :(


But no matter what I make, or don't make, this week, I did make some pretty outrageous pancakes last week.  Like, awesomely outrageous.  So good that I'll just leave you with my Picky Eater's words about them:

"Mama, you made these 100% YUM."

Whole-Grain Pancakes
Recipe from Food Network Magazine
Prep time: 15 minutes   Cook time: 20 minutes

3/4 cup old-fashioned oats
1/4 cup flaxseed
1 cup whole-wheat flour
1 tsp baking powder
1/2 tsp salt
2 large eggs, separated
1 1/2 cups milk
3 tbsp butter, melted, plus more for the skillet
3 tbsp sugar
1.  Pulse the oats and flaxseed in a blender or food processor until finely ground; transfer to a large bowl. Add the flour, baking powder and salt and whisk until combined.
I love how healthy this looks already


2.  Whisk the 2 egg yolks and milk in a separate bowl; add to the dry ingredients along with the melted butter and whisk until just smooth.
Yep, typical dense-looking batter.  But we can make it better!


3.  Beat the 2 egg whites and sugar in another bowl with a mixer until soft peaks form; gently fold into the batter until just combined.
Soft peaks still flop over.  Be patient; it will take a bit to get here.

Fluffy batter thanks to the air whipped into the egg whites!

4.  Lightly butter a nonstick skillet and place over medium heat. Working in batches, add about 1/4 cup batter for each pancake; cook until bubbly on top, then flip and cook until golden brown on the other side, about 3 minutes per side.
Mmmmmmmmmmmmmmm.........


I made these for dinner but I totally can't wait to make these for Saturday morning breakfast.  What a fabulously tasty (& healthy!!!) way to start out the day!  Whether you choose to drown them in maple syrup or make up a quick strawberry sauce, your family will never know these are good for them.  All they'll taste is nutty, fluffy pancake-deliciousness.

Seriously 100% yum!
Pin It

Thursday, January 17, 2013

This Week's Menu

I love that when I get away for the weekend, I'm given a little meal-planning break.  And, BONUS, stuff in my house is getting accomplished too!  YAAAAY!!!

Oh yeah, don't forget to vote for my birthday cake next month!!  The winning cake will be baked up and, because I really can't see how any of those options would be yucky, I'll post the recipe.  So which recipe would YOU like to have?

  • Thursday: I'm taking advantage of Gavin's 3-day weekend and spending time with the in-law's.  Rob's taking advantage of my taking-advantage by getting some serious house projects done.  Win-win!
  • Friday: I'm gone, not sure what Rob's eating... probably pizza.  I know. Shocker.
  • Saturday: Still traveling!
  • Sunday: Finally home but I'm leaving the menu up to Rob to get together.  Did you hear that sweetie?  Rob?  Hello?
  • Monday: New Recipe! Red Beans and Rice and tossed salad
  • Wednesday: New Recipe! Baked Chicken with Parmesan Crust, fresh bread, and some kind of vegetable yet to be exactly determined.
Happy planning!!
Pin It

Tuesday, January 15, 2013

Twice-Baked Potatoes

How have I gone 30 years without discovering the awesomeness of twice baked potatoes?!?


HOW???

Twice-Baked Potatoes
Recipe adapted from Ree Drummond
Prep time: 15 minutes   Cook time: 1 hour, 20 minutes

4 baking potatoes, washed
2-3 tbsp canola oil
3 tbsp butter
1/3 cup crumbled bacon, optional
1/2 cup sour cream
1/2 cup Cheddar or Jack cheese (or a mix of both), plus more for topping
2 tbsp-ish milk
Salt and freshly ground black pepper
1 tbsp finely chopped chives

1.  Preheat the oven to 400 degrees F.

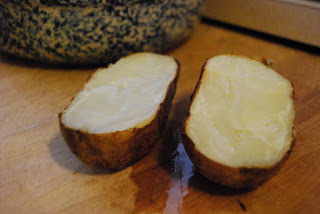
2.  Place the potatoes on a baking sheet. Rub them with the canola oil and bake for 1 hour, making sure they're sufficiently cooked through.
Can you tell which ones are for Mommy & Daddy and which are for the kiddos?


3.  In a large mixing bowl, combine the butter, bacon (if using), and sour cream. Remove the potatoes from the oven. Lower the heat to 350 degrees F.
PERFECTLY cooked with a nice crispy skin thanks to the oil.


4.  With a sharp knife, cut each potato in half lengthwise. Scrape out the insides into the mixing bowl, being careful not to tear the shell. Leave a small rim, about 1/4", of potato intact for support. Lay the hollowed out potato shells back on the baking sheet.
Leave some potato flesh to give the shell some structure.


5.  Smash the potato filling into the butter, bacon, and sour cream. Add the cheese, milk, salt, pepper, and chives to taste and mix together well.  
Yes, I could totally just eat this as is.  You would too; admit it.


6.  Fill the potato shells with the filling. Top each potato with a little more grated cheese.  Now here's what's really cool: at this point you could freeze the potatoes to bake up another time.  If you decide to take advantage of this Get Ahead moment (yesyesyesyesyesYES!!!), omit the chives; use them for garnish instead after baking.  If you plan to eat right away, then bake at 350 until the potato is warmed through and the cheese is nice and melty, 15 to 20 minute (psst! It'll be closer to 30 minutes if the potatoes are sharing an oven with another dish).
Mere moments away from glory.


These. Are. Amazing!!!  And yes, sort of time consuming to make, but sooooo worth the effort!  Especially now that I know I can freeze them for another time.  And the flavor is outstanding... if you like sour cream/onion/cheddar potato chips then these are right up your alley.

Ok so you run along and discover for yourself how incredible these are.  I have to go redesign my garden to include a little potato patch so I can make a TON of twice-baked potatoes for my freezer.   Cheers!
Pin It

Monday, January 14, 2013

Lemon-Onion Chicken

Who likes finding a yummy new recipe using the same old ingredients you always have around?! 


I DO!!!

Lemon-Onion Chicken
Recipe adapted from Melissa D'Arabian
Prep time: 10 minutes   Cook time: 20 minutes

4 boneless, skinless chicken breast halves
1-2 tsp dried thyme, divided
Salt and freshly ground pepper
3 tbsp extra-virgin olive oil
1/4 cup all-purpose flour
1/2 large red onion, thinly sliced
1/4 cup white wine
1 cup chicken stock
Zest and juice of 1 lemon
1 1/2 tbsp butter

1.  Heat a large saute pan over medium heat and add the olive oil.
Don't be too skimpy with the seasonings.


2.  Season the chicken with about 1 tsp dried thyme, lemon zest, and salt and pepper to taste.  Put the flour in a shallow dish. Dredge the chicken in the flour and add to the pan; cook until golden brown, about 3-5 minutes per side. Transfer to a plate and tent with aluminum foil.
GORGEOUS golden brown color.


3.  Add the red onion and remaining teaspoon of thyme to the pan and cook over low heat, stirring occasionally, until aromatic, about 5 minutes.   
I adore the color that red onions add to a plate.


4.  Combine the wine, chicken broth and lemon juice in a bowl. Turn the heat under the pan to high and deglaze with the broth mixture, scraping up the pan with a wooden spoon. Add the chicken back to the pan, turning to coat it in the sauce.  Top each piece of chicken with some of the onions, cover the pan and simmer until the chicken is cooked through, about 5-7 minutes.
Yes, I forgot to take a picture of the sauce simmering.  Oops!


5.  Uncover the pan and continue to simmer until the liquid starts to reduce, about 5 minutes. Remove from the heat and whisk in the butter. Season with salt and pepper.

As I was pulling this together, it felt a lot like a variation of chicken piccata.  Rob and I really enjoyed the flavor of this dish.  The onions really give this a deeper, earthier flavor.  The lemon zest and juice brighten the dish, without making it too perky. 

And I especially loved how, with this sauce, I could easily omit the onions in the servings I gave my boys.   Because they haven't yet discovered how awesome caramelized onions are.  But they will someday!  Just give me time... ;)
Pin It

Thursday, January 10, 2013

This Week's Menu

For some reason, comfort food has me totally inspired this week.  I just want to make all these warm, cozy dishes, and snuggle in with my fleece pants and fuzzy socks.
  • Saturday: Meatloaf with twice baked potatoes and steamed veggies (It doesn't get any more comforting than this!!)
  • Monday: Our PTA has setup a fundraiser at a local BW3's, so we will be dining there this evening solely for the purpose of raising money for Gavin's school.  And not at all because I sometimes day dream about their wings.  Or because I really need another bottle of Spicy Garlic sauce.  Or Asian Zing.
  • Tuesday: Leftovers
  • Wednesday: New Recipe! Whole grain pancakes and some kind of fruit topping or fruit salad along side.
Happy planning!!
Pin It

Wednesday, January 9, 2013

Papa's Pot Roast

I have, I'm not kidding, spent years trying to improve the recipe.  And I think I've tried just about anything that you could think of:

  • I've tried making this in the slow cooker instead of the oven
  • I've tried adding herbs, fresh or dried
  • I've tried switching the water for red wine
  • I may have even tried adding some vegetables but that was really so long ago that I don't fully trust my memory there
And yet despite all my best efforts, it NEVER tastes as good as when I just stick to the recipe card as my mother-in-law wrote it.  Sometimes you just can't mess with perfection.


Papa's Pot Roast
Recipe from my mother-in-law
Prep time: 5 minutes   Cook time: 6 hours

2 1/2 - 3 lb FROZEN chuck roast [Yes, frozen solid. Just go with me on this]
Salt & freshly ground black pepper
1 pkg dry onion soup mix
1 can cream of mushroom soup
1/2 soup can water

1.  Preheat oven to 250.  

2.  Take the roast out of the freezer and give it just a super quick rinse in cold water.  Place the roast in center of heavy duty aluminum foil. Season generously all over with salt and pepper, which will now stick to the roast because it's wet.
It's a roast.  Don't be afraid of a good S&P crust.

 
2.  Sprinkle on onion soup mix and then cover with mushroom soup. Pour water around the edge of roast.
Sometimes I live dangerously do the mushroom soup before onion.

 
3.  Wrap roast with drug store type seal so juices won't come out [Side note: you really want to use HD foil for this.  Double wrapping with regular foil just isn't strong enough contain the awesome flavor]. Put wrapped roast on cookie sheet in case of leaks. Bake for 6 hours, "or until it smells so good that you just can't stand it any longer." 
Drug store Seal = folding the edges together and then rolling it down

Look at all that FLAVOR!!!!


Normally I wouldn't tell you what side dishes to make for a meal, but you pretty much HAVE to make mashed potatoes with this.  The two soups, water, and glorious meat juices come together to create this effortless gravy that begs to be spooned over some fluffy, buttery potatoes.

 Also, let me also say that Good Things Come to Those Who Wait.  Gavin has always hated anything with beef.  He's just not a Beef Eater.  But this last time I made this?  He turns to me and says "this is really good Mama." 

I'm not ashamed to admit that I teared up a little bit.  VICTORY!!!!
Pin It

Monday, January 7, 2013

Cranberry Orange Cheese Spread

This is one of those kinds of spreads that people just can't get enough of.  It's sweet, but not Too Sweet.  It's festive, but not Too Festive.  And it makes a perfect appetizer without being Only An Appetizer.


Cranberry Orange Cheese Spread
Recipe slightly adapted from a Keebler cracker ad
Prep time:10 minutes   Chill time: at least 1 hour

1 (8oz) brick of neufchatel OR regular cream cheese, softened
Zest of 1 orange
Juice of half an orange
1 tbsp sugar
1/8 tsp cinnamon
1/4 cup finely chopped dried cranberries
1/4 cup finely chopped pecans (optional)

1.  In small mixing bowl beat neufchatel, orange zest & juice, sugar, and cinnamon on medium speed until fluffy. 
Sometimes I forget and add the cranberries too early.  Oh well, it doesn't hurt!


2.  Stir in cranberries and pecans.   At this point you could shape it however you like, using cling wrap: a ball, a log, or leave it in a bowl to scoop out.  Refrigerate at least 1 hour before serving. 
I chose the cheese ball route: line a small bowl with plastic wrap.

Fill the lined bowl with the cheese...

...and smooth out the filling.

Fold the excess wrap over the top and chill

When firm, unfold the excess and pull the ball out of the bowl.

Invert the ball over the serving dish and peel back the plastic wrap.


I love the versatility of this spread!  It's absolutely addicting as a party appetizer.  I've lost count now how many times I've given out this recipe actually.  But my favorite use for this spread is with the leftovers.  I ADORE this on English muffins or bagels in the morning.  And lately I've been struggling with new ideas for my toddler's breakfast.  I found these cute little whole grain mini-pita pockets at Trader Joe's a while back and decided to tuck spoonfuls of the cheese inside.  He inhaled them!  

I think I'll have to make another batch of this spread this week just for my family to enjoy.  Yes, it's that good!
Pin It

Thursday, January 3, 2013

This Week's Menu

Happy New Year!  How was your holiday?  Mine was great, other than the whole getting-sick-over-New-Year's thing.  Both me and Kieran, down for the count.  But otherwise we had a super great time with each other and extended family.  Yay!

But now it's back to the routine.  And for that, of course I need a plan:
  • Thursday: I'm having a little get together so I'll feed the boys earlier and plan on making my dinner from the various snacks I'll have.  Snacks like a New Recipe! cranberry-orange cheese ball, 5-Layer Mexican Dip, truffles, and veggies with dip.
  • Sunday: Spaghetti, garlic bread, and tossed salad
  • Monday: New Recipe! Pork chops with applesauce, steamed veggies
  • Tuesday: Leftovers
Happy planning!!
Pin It