Showing posts with label Dessert. Show all posts

Tuesday, February 12, 2013

Chocolate Blackout Cake

Ok, after much hype, here it is....
 

Chocolate Blackout Cake
Recipe slightly adapted from Food Network Magazine
Prep time: 2 hours   Chill time: 1 hour   Cook time: 50-60 minutes

For the cake:
Cooking spray
1 cup unsweetened cocoa powder
1 1/2 cups boiling water
2 cups all-purpose flour
1/2 cup whole wheat flour
2 cups sugar
1 1/2 tsp baking powder
1 tsp baking soda
1 tsp salt
3 eggs
3/4 cup canola oil (OR split this in half between oil and unsweetened applesauce)
1/2 cup sour cream
2 tsp vanilla extract

For the filling:
1 cup whole milk
1/3 cup sugar
2 tbsp cornstarch
1 tsp vanilla extract
1 egg
2 oz semisweet chocolate, finely chopped

For the ganache:
12 oz semisweet chocolate, finely chopped
Pinch of salt
1 1/2 cups plus 2 tbsp heavy cream, divided

1.  For the CAKE: Preheat the oven to 350 degrees F. Coat two 9-inch-round cake pans with cooking spray. 
 
2.  Whisk the cocoa powder and the boiling water in a medium bowl until smooth; set aside. 
It's so easy to hide healthy bits, like wheat flour, in chocolate.
 
 
3.  Whisk the flours, sugar, baking powder, baking soda and salt in a large bowl until combined. Add the eggs, vegetable oil, sour cream and vanilla and beat with a mixer on medium speed until smooth, about 1 minute. 
Can you tell I used light sour cream here?
 
 
4.  Reduce the mixer speed to low; beat in the cocoa mixture in a steady stream until just combined, then finish mixing with a rubber spatula. (The batter will be thin.)
I need a straw.


5.  Divide the batter between the prepared pans and tap the pans against the counter to help the batter settle.  Put both pans on a cookie sheet in case of spills.  Bake until a toothpick inserted into the middle comes out clean, about 40 minutes (closer to 50 though if you're like me and only have 8-inch pans). Transfer to racks and let cool 10 minutes, then run a knife around the edge of the pans and turn the cakes out onto the racks to cool completely.
Mine puffed up quite a bit.

 
6.  For the FILLING: Bring the whole milk to a simmer in a medium saucepan over medium heat. Whisk the sugar, cornstarch, vanilla and egg in a medium heatproof bowl until smooth. 
The beginnings of a beautiful pastry cream.
 
 
7.  Gradually whisk half of the hot milk into the sugar mixture, then return that mixture to the pan with the remaining milk. Reduce the heat to medium low and cook, whisking constantly, until the mixture boils and thickens, 2 to 3 minutes. 
Your arm will get sore but your efforts WILL be rewarded.
 
 
8.  Transfer to a bowl (strain through a fine-mesh sieve if it looks lumpy), then stir in the chocolate until melted. Press plastic wrap directly onto the surface and refrigerate until cold, at least 1 hour. 
Tell me again why I shouldn't just dig in?
 
 
9.  For the GANACHE: Put the chocolate and salt in a large heatproof bowl. Bring 1 1/2 cups heavy cream to a simmer in a saucepan over medium heat; pour over the chocolate and whisk until smooth. 
I have no words.  Dear God....
 
 
10.  Pour 3/4 cup of the ganache into a liquid measuring cup and set aside at room temperature. Refrigerate the remaining ganache in the bowl until thick but not set, about 1 hour.
Same stuff, two different frostings.


11. Cake ASSEMBLY: Trim the tops of the cakes with a long serrated knife to make them level.  Put 1 cake layer on a platter, cut side up; spread the filling on top, stopping about 1/2 inch from the edge. Top with the second cake layer, cut side down, and press down gently.


It's coming together!!


12.  Add the remaining 2 tablespoons heavy cream to the chilled ganache and beat with a mixer on medium speed until just fluffy, about 1 minute (do not overbeat). 
I gave Kieran a taste of this.  His reaction was priceless!!
 
 
13.  Frost the whole cake with the whipped ganache. Pour the room-temperature ganache on top, letting it drip down the sides. Let set before slicing, about 30 minutes.
Obviously I'm not an expert froster.  Don't really care either.

Go ahead.  Lick the screen. I won't tell.
 

Ok so if you couldn't tell, this isn't a run-of-the-mill, ordinary, hey-let's-celebrate-Wednesday kind of cake.  However, DON'T BE INTIMIDATED by the number of steps!  Every bit of this cake is very easy to assemble; if you can chop, scoop, stir, and spread you can make this cake.  
 
And actually, there are some very simple, "Everyday" swaps you could make for this cake to come together a little faster if you like.  Use a box mix if you like!  I have nothing against box cake mixes.  The filling here is this gloriously decadent pastry cream, which is similar to pudding.  For the frosting, if you don't want to mess around with ganache then use a regular chocolate frosting.  But whipping some ganache and then drizzling more on top just totally MAKES this cake!  It becomes a truffle-coated cake.  H-E-A-V-E-N!!!!

Oh, and in case you're wondering, here's some photographic results by my resident food critics.  Remember, a picture is worth 1,000 words. ;)
Kieran wastes no time getting chocolate EVERYWHERE

Gavin had trouble taking small bite; just wanted to eat this in great big gulps!

Pin It

Tuesday, February 5, 2013

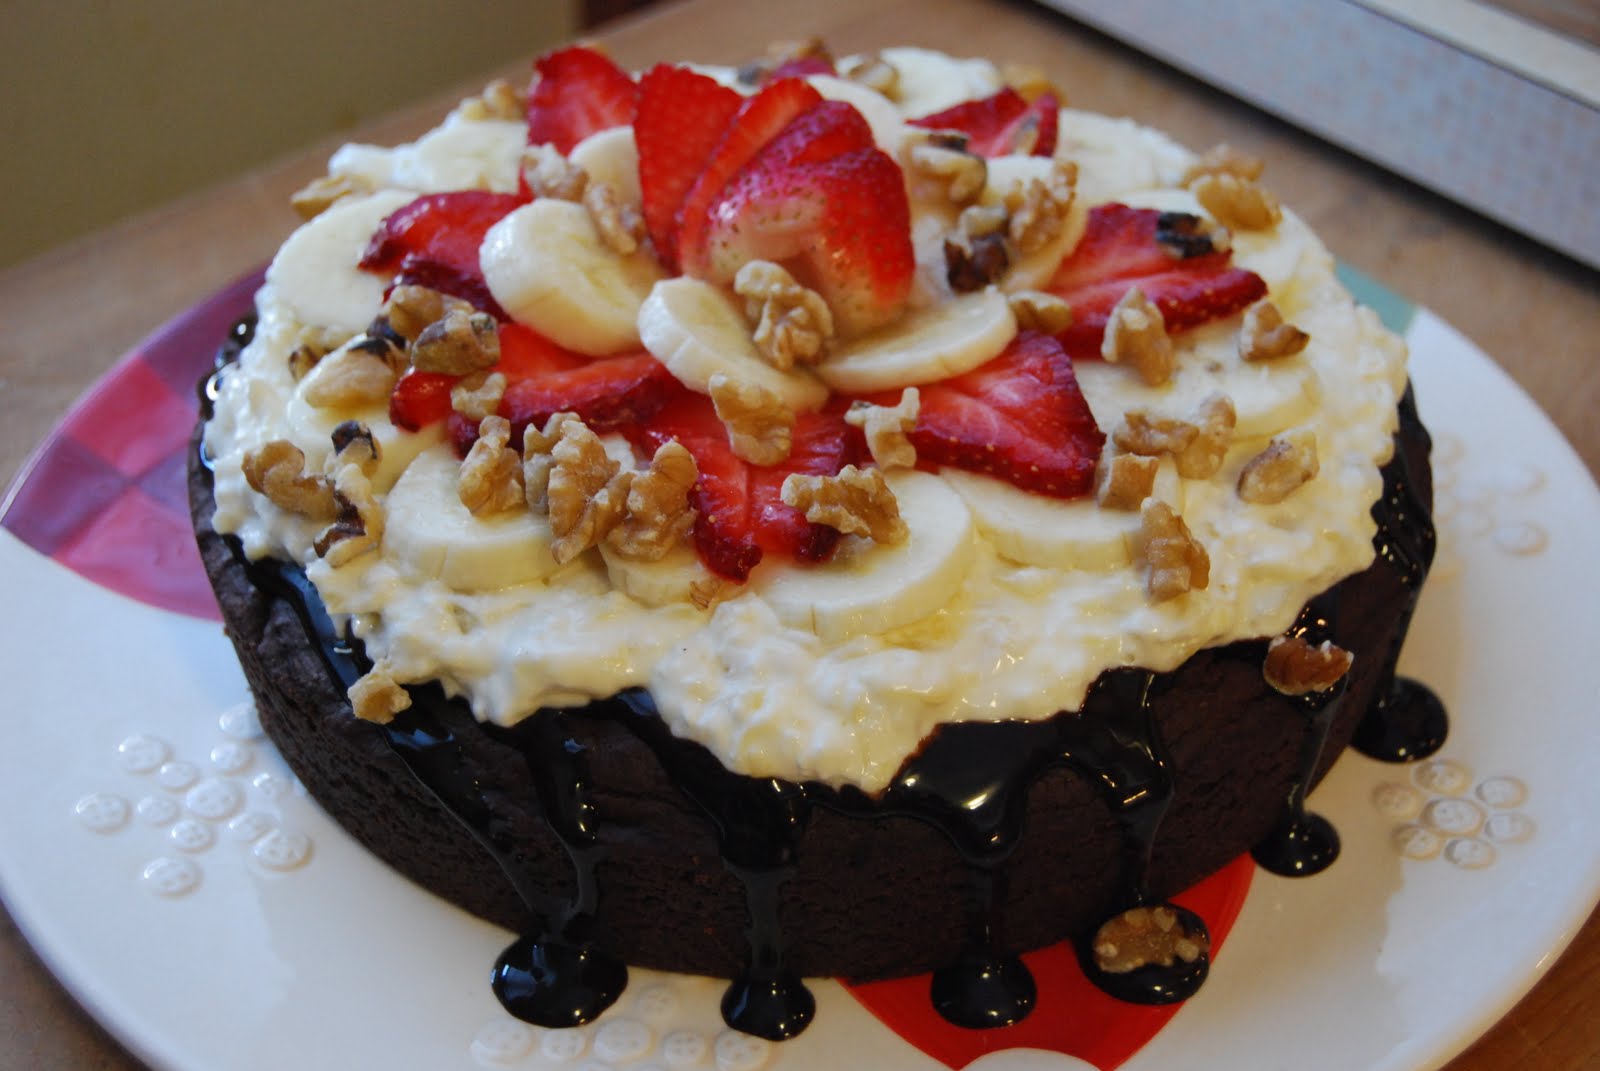
Brownie Banana Split Pizza

I'm trying to force myself to work on some other blog posts to put up here for you, and I keep coming back to this one.  I keep daydreaming about this one.  I want to keep eating this one.


So, why fight it?  I think you should share in my current dessert obsession. ;)

Brownie Banana Split Pizza
Recipe adapted from Bobby Deen
Prep time: 20 minutes   Cook time: 20-25 minutes

1/2 cup melted canola oil
1 1/4 cups flour
1/2 cup cocoa powder
2 tsp baking powder
1/4 tsp baking soda
1 tsp salt
2/3 cup honey
1/2 cup applesauce
3 tbsp chocolate syrup
4 oz whipped cream cheese
1 tbsp sugar
One 8-ounce can crushed pineapple, drained
2-3 fresh strawberries, thinly sliced
1 banana, thinly sliced and tossed in lemon juice to prevent browning
1/4 cup chopped walnuts

1.  For the brownies: Preheat the oven to 325 degrees F. Grease a 9-inch cake pan with cooking spray; set aside.
I love where this is going.


2.  Whisk together the flour, cocoa powder, baking powder, baking soda and salt in a medium bowl. Add the oil, honey, and applesauce directly into the dry ingredients. Stir until the batter is smooth.
Who wants to lick the bowl??


3.  Pour the batter into the prepared pan. Bake on the center rack until a toothpick inserted in the center comes out clean, 20-25 minutes.  Cool completely before assembling the pizza.
Keep checking the middle for done-ness! You don't want it collapsing on you.


4.  For the pizza: Remove the brownie from the cake pan and place in the middle of a cake plate.  Drizzle with chocolate sauce.
*drooooooooooooooooooooooooooool*


5.  Beat the cream cheese, sugar and pineapple together in a bowl with a spatula. Spread the mixture over the cooled brownie crust.
I could eat just this for breakfast.

Creamy. Fluffy. Lovely.


6.  Arrange the strawberry and banana slices over the cream cheese mixture. Sprinkle with the chopped walnuts. Freeze for at least 30 minutes. Slice into wedges for serving.
WARNING! Do not attempt to eat your computer screen!
This is only a picture.


Now, I was a little nervous about this recipe because of the brownie.  Obviously it's a cake-like brownie and there's not a whole lot of sweetness to it.  And it was a little dry.  But as I pulled the whole thing together, it began to make sense.  This not-so-sweet brownie is meant to complement it's sweet and fruiting toppings, not out-do them.  Between the refreshing bananas and strawberries, crunchy walnuts (my fav!!), bright and creamy cream cheese layer, and the chocolate-y base....omg can you see why my brain is still dwelling on this beauty?!
Pin It

Tuesday, December 18, 2012

Apple Dip

It's CHRISTMAS!!!! That means Christmas parties are coming.  That means I can make Apple Dip.  Because this is the ONLY time of year that I allow myself to make this.  And I only make this for parties.

That way I'm not left gorging on an entire bowl of it myself.  Because I can.  And I would. 


Apple Dip
Recipe from Quick Cooking Magazine
Prep time: 15 minutes


8oz cream cheese, softened
1/2 cup peanut butter
1/3 cup brown sugar
1 tsp vanilla
1/2 cup mini marshmallows
1 jar hot fudge ice cream topping
Lots of super tart apples, like Granny Smith
2 tbsp lemon juice

1.  In a small bowl, beat the cream cheese, peanut butter, brown sugar and vanilla until smooth; stir in marshmallows.

Use kitchen shears to quarter big marshmallows into minis.


2.  Spoon half into a 3-cup bowl; spread with half of the hot fudge topping. Repeat layers.  Refrigerate until ready to serve.
Chocolate fudge is NOT like Hot Fudge topping!!
THIS is the good stuff.


3.  Toss the apples with lemon juice. Serve immediately with dip. 
Layer 1

Layer 2

Layer 3

Layer 4


There are two things I've learned about this dip in the last 8ish years I've been making it:
  • Even if you prefer to eat sweet apples, you MUST get the tart ones for this.  This dip is rather rich and very sweet.  Tart apples have that bite to balance out the sweetness.  A sweet apple is just going to make this taste like sweet overkill. 
  • Not all fudge ice cream toppings are created equal.  A couple times now I have been lured into saving .10 and buying chocolate fudge topping instead of hot fudge.  NEVER AGAIN!!!  Chocolate fudge has a thinner, looser consistency that's easier to spread, but not dense enough to hold up that second peanut butter layer.  You really do need that slightly more expensive, thicker hot fudge topping.
Pin It

Tuesday, November 27, 2012

Chocolate Peanut Butter Pie

I am not above bribery.  If I'm making something for dinner that I'm not sure Gavin will eat, I like to have something truly decadent for dessert to see if he'll go for it.


Behold!  Something outrageously decadent!!

Chocolate Peanut Butter Pie
Recipe from Ree Drummond
Prep time: 15 minutes   Chill time: at least 1 hour

For the crust
25 whole chocolate sandwich cookies
4 tbsp butter, melted


For the filling
1 cup peanut butter
1 (8oz) pkg softened cream cheese [psst! Use Neufchatel cheese if you're concerned about calories]
1 1/4 cups powdered sugar
1 (8oz) container Cool Whip, thawed

1.  For the crust: In a food processor, crush the chocolate sandwich cookies until they’re fine crumbs. Pour melted butter over the top and pulse until the crumbs look like moist potting soil. Press into pie pan and bake at 350 degrees for 5 to 7 minutes, or until set.  Remove from oven and allow to cool completely.
My camera didn't like the sudden BLACKNESS of the crust.


2.  For the filling: Beat the peanut butter with the cream cheese until smooth. Add powdered sugar and beat until smooth. Add in the thawed Cool Whip and beat mixture until smooth, scraping the sides as needed.
Be careful beating in the sugar that you don't cover yourself in a fine white coating.


3.  Pour filling into crust, evening out the top with a knife or spatula. Chill for at least an hour before serving.
Omg.  I could lick the screen.


Gavin likes to keep me on my toes.  As much as my Picky Eater loves sweets, if there's something on his dinner plate that he Really Doesn't Like, the absolute best I can hope for is that he'll consume his required minimum bites with as little drama as possible.  BUT, I'm getting sick of the drama.  I'm getting tired of his squeamishness over trying new flavors and textures.  So yes, you could say that I  decided to fight dirty by making a pie out of his two Most Favorite Flavors in the Entire Universe.

I don't care.  It worked!!
Pin It

Tuesday, November 6, 2012

Pear Ginger Breakfast Cake (Gluten & Dairy Free!)

If you are not fortunate enough to vote at my polling place, and therefore have access to our PTA's bake sale right when you walk in the doors, rest assured you can still enjoy at least what I donated!  This year I made some chocolate zucchini bread AND two of these lovely cakes.  By the time I voted at 8:15, only one of the cakes was left.  How's that for an endorsement??


Pear Ginger Breakfast Cake (Gluten & Dairy Free)
Recipe adapted from I have no idea what website anymore because I've had this for so long
Prep time: 15 minutes   Bake time: 45-50 minutes

2 ripe pears
2 tbsp finely chopped crystallized ginger
2 large eggs
3/4 cup sugar
1/2 tsp vanilla
2/3 cup brown rice flour
1/3 cup cornstarch
1/2 tsp baking powder
1 tbsp vegetable oil
Powdered sugar, optional

1.  Preheat oven to 350. Grease a medium-sized loaf pan. 
I made two cakes so I of course used double of the ingredients.


2.  Peel, core and dice the pears. Spread in baking dish and top with the crystallized ginger.  
My kids LOVE to snack on crystallized ginger!  That's probably why I'm low on it now.


3.  Beat eggs and sugar until pale in color and very thick. Add vanilla.  
Such a sunshine-y color


4.  Combine rice flour, cornstarch and baking powder. Sift over egg mixture and fold in. Drizzle oil around edge of bowl and fold in. Spread batter over diced pear.  
The consistency is similar to pancake batter.


5.  Bake for 45-50 minutes, until the top is lightly golden. Dust with powdered sugar, if desired. 
Ready for the oven!


This cake is AMAZING!!!  The cake part on top cooks up moist and delicious, with this thin crackly, crunch layer just at the top where it's golden.  And I swear pears and ginger are just about the most perfect pairing; they are juicy and succulent and oh-so-delicious underneath all that cakey goodness.  Whether you have this for breakfast or not, whether you have a gluten or dairy allergy or not, THIS cake is WORTH MAKING!
Pin It

Wednesday, July 25, 2012

Peach Blueberry Pie

If you asked me during the fall or winter what my favorite pie is, I'd tell you it's my dad's pear-ginger

But once summertime hits, I want only one thing.  THIS pie.

Peach Blueberry Pie
Recipe from my dad
Prep time:30 minutes   Chill time: 45 minutes (crust)   Bake time: 55 minutes

For the crust
2 cups all-purpose flour
1/4 cup cake flour (or just use more AP flour)
1/4 tsp baking powder
1/4 tsp salt
2 sticks COLD butter, diced
4-5 tbsp COLD water

For the pie
3 cups peach slices, fresh or frozen
3 cups blueberries, fresh or frozen
1 cup sugar
3 tbsp tapioca, quick cooking
1/3 tsp salt
1 tbsp lemon juice
1 tbsp butter

1. For the crust: Put all dry ingredients into a bowl or food processor. If using a bowl, cut in the butter with a pastry cutter.  Or pulse butter in the food processor until it resembles coarse sand.
Need those little butter chunks for a good flaky crust


2.  Add in 4 tbsp of the cold water and continue to pulse the food processor (or use a fork to combine) until the dough comes together.  Add another tbsp of water if it's too dry.
If the water's not cold enough, add ice.


3.  Turn the dough out onto a lightly floured surface and shape into two disks, about an inch thick.  Wrap in plastic wrap and chill at least 45 minutes.
My disks ended up square. Not sure how but oh well.


4.  For the pie: Preheat oven to 450.

5.  Combine peaches and blueberries in a large bowl.  In a small bowl, combine sugar, tapioca, and salt.  Add to the fruit and gently mix until everything is coated in the sugar mixture.  Sprinkle lemon juice over the fruit.  Lightly toss to mix.
Oh those sparkling, sugary, summertime gems!


6.  On a flour surface, roll out one of the pie crust disks to the desired thickness and diameter you need for your pie plate. Put the bottom crust in pan and either trim or tuck the excess underneath.
Awaiting some fruity goodness


7.  Fill with the fruit.  Cut the last tablespoon of butter into small pieces and dot it on top of the fruit.  Roll out the remaining pie crust disk and place on top of the fruit.  Trim the excess and crimp the edges.  Cut several slits on top for steam to escape as it bakes.  You are welcome to brush and egg wash on top if you like but it's not necessary.
Yes, MORE butter.  Don't question, just go with it.


8.  Bake at 450 for 10 minutes.  Reduce heat and bake for 30-45 minutes or until lightly browned.
One time Dad made a smiley face with the slits.


My favorite pie really does vary depending on the season.  And my dad makes several other wonderful pies!  Sour cream apple, rhubarb, apple-pear with a crumb topping, apple-cranberry,....oh my goodness the list goes on.  But every summer, without fail, I CRAVE this pie.  This one totally hits the summertime spot!
Pin It