Monday, February 28, 2011

Sweet and Sour Brisket

I love contrast.  I love how you can take two things that really should be polar opposites of each other, put them together, and the end result is fantastic.  I especially love contrast when it comes to food.  I'm one of Those People who love sweet and salty together, hot and cold, soft and crunchy... all in one nice little package.  I think contrasting tastes and textures in food keeps things interesting.  I know not everyone is on board with me on this one but that's ok.  I've long-ago accepted that I'm just weird sometimes.

If you couldn't tell by my previous posts, I've been playing a lot with Ellie Krieger's new cookbook, which was a birthday present (THANK YOU Mom and Dad!!!).  I've been finding soooo many good recipes in it  that I was inspired to go back to her first cookbook, which is also one of my favorites.  This recipe caught my eye for two reasons: 1) sweet and sour.  Hello contrasting flavors!  And 2) the star ingredient is brisket, which I've been dying to try making one for some time now.  Alright, let's make this dish!!

And so begins my quest for a brisket.  You'd think that in The Dairy State that a beef brisket would be easy to find, right?  WRONG!  At grocery store #3 I finally found what I was looking for.  Any grocery store people reading this?  Take note: stock brisket please!!
Couldn't ask for a more perfect day to cook all afternoon
 So I get home with this gorgeous piece of meat and start on my recipe.  Oh. My. GOODNESS.  This is an easy cut to work with AND this recipe ROCKS.

Sweet & Sour Brisket
Recipe from The Food You Crave


One 3lb beef brisket
1 tbsp salt
1/2 tsp pepper
2 tbsp canola oil, divided
1 medium onion, thinly sliced into half moons
3 cloves garlic, minced
One 15oz can of tomato sauce
1/4 cup low-sodium chicken broth or water
3 tbsp brown sugar
1/3 cup, plus 1 tbsp, apple cider vinegar
1/3 cup raisins
5 black peppercorns
1 allspice berry [Note: I did not have this so I just sprinkled in some ground allspice]

1. Preheat oven to 300.

Yeah, a smidge more salt and pepper than called for
2. Pat brisket dry and sprinkle with salt and pepper. [I should interject that though I wrote down the above measurements, I did not measure as I seasoned the meat.  I've found that when you're cooking meat like this, don't be shy about seasoning; so I don't like to be limited by adhering to measurements.]  Heat 1 tbsp oil over medium-high heat in a Dutch oven or braising pot.  Sear the brisket until it is browned, 4-5 minutes per side.  Transfer the brisket to a plate.


Mmmmm, garlic...
3.  Add the remaining tbsp of oil to the pot and cook the onion, stirring a few times, until softened, 3-5 minutes.  Add the garlic and cook another minute.  Add the tomato sauce, broth, brown sugar, 1/3 cup vinegar, raisins, peppercorns, and allspice and stir to combine well.  Bring the mixture to a boil, return the brisket (fat side UP) and any accumulated juices to the pot.  Spoon some of the tomato mixture over the brisket, cover tightly, and transfer to oven.  Cook until the brisket is fork tender, 2 1/2 to 3 hours.


Hello Gorgeous
4.  Remove the brisket from the oven and transfer meat to a cutting board (if it falls apart on you while getting it out that's ok).  Let rest for 10-20 minutes.  If you're serving this later, cover and refrigerate meat and sauce for several hours or overnight.  When you're ready to serve, cut the meat against the grain into 1/4-inch thick slices.  Stir remaining tbsp vinegar into the warm sauce.  Return the sliced brisket to the sauce until heated through, then serve.


 Reading through the instructions, I thought this might be a little complicated but really it's not.  It came down to browning meat, cooking sauce, returning meat to sauce to bake, then take meat out to cut, put slices back into sauce.  Easy, right?  And oh my goodness the FLAVOR!!  This one definitely hit home in my love fore contrasting flavors.  It's a lightly sweet, thick sauce with this glorious tang to it that just has my saliva glands falling to their knees and saying "THANK YOU!!"  Super yummy.  Honestly easy to put together. If you like contrasting flavors like I do, try this one.
The lovely brisket is paired with some white bread and maple-glazed carrots.
Pin It

Friday, February 25, 2011

Get Ahead: Chicken-Mushroom Quesadillas

I'm going to challenge you this weekend.  Yup, I said it.  I challenge you to pick out a recipe you really enjoy but never make because it's pretty involved and make it this weekend.  Eat it right away if you like but freeze a portion of it for another night.  You can do this.  You can totally do this!  And after you make it, let me know what you made so then I can turn the tables and ask for your recipes. ;)  Oh, and you get bonus points if you double your recipe.

Now, what am I up to this time...ah yes, something involving cheese!

Who doesn't love quesadillas?  Melted cheese in between two crispy tortillas, topped with creamy sour cream, spicy salsa, or maybe some cool guacamole.  I also happen to love how EASY quesadillas are to make.  Have them as an appetizer for a party or for a quick weeknight dinner, these things are awesome!

I never really thought much about what you could do with a quesadilla until my mom introduced me to this recipe a few years ago.  Obviously I must have liked it but what I really remember was my son inhaling these!  I decided then and there to make this on my own, with some tweaks according to my family's tastes.

Chicken-Mushroom Quesadillas
Recipe adapted from So Easy


1 tbsp canola oil
1 large onion, chopped
1 container cremini mushrooms
3 cloves garlic, minced
2 cups cooked chicken, either diced or shredded
1 tsp cumin
1 tsp oregano
1 tsp chili powder
2 cups baby spinach
1/2 tsp salt
1/4 tsp pepper
Tortillas
Shredded cheddar cheese
Preferred toppings

1.  Use a damp cloth to gently wipe off any dirt on the mushrooms [Note: do NOT run mushrooms under running water!  Mushrooms are little flavor sponges; rinsing them under water means they will soak up the flavor of...well, water].  Break mushrooms apart a little and toss into food processor.  Process until they almost have a paste consistency and look similar to ground beef.

Does this look like ground beef to anyone else?

2. Heat canola oil in a large skillet over medium heat.  Add onions and mushrooms and cook until mushroom water has evaporated and mixture is beginning to brown (about 5-7 minutes).


3.  Add garlic and cook for another minute.  Toss in cooked chicken and seasonings and stir to combine.  Add spinach, salt, and pepper and toss just until spinach has wilted a little.

LOVE that bright green color!!
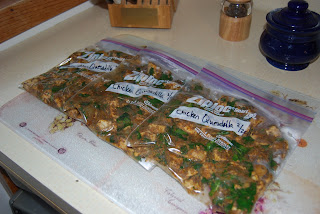
Ok so at this point you have some options.  You can continue on to step 4 and make up the quesadillas right away, OR you can cool the mixture and store it in freezer bags for later use.  If you opt for the latter, let the mixture thaw before picking up again at step 4.

4. Heat a griddle over medium to medium-low heat.  Take a tortilla and sprinkle a little shredded cheddar on one half.  Top with a couple tablespoons of chicken mixture and sprinkle a little more cheese on top [Note: a little goes a long way].  Fold the tortilla over.  Toast the quesadilla on both sides until cheese is melted.  Top with favorite toppings and enjoy!
One recipe equates to THREE dinners for us, plus leftovers if we're not too starving that night.
You probably picked up on the fact that this doesn't take much time to put together.  So why do I think of this as a "get ahead" recipe?  Because it makes a TON!  You really don't need much filling for each quesadilla so one recipe could feed quite the crowd.  I will typically make a batch of this, split it into thirds and freeze it in quart freezer bags until I'm ready to make them.  Not only is this super easy to make, but HEALTHY too!  And with such lovely seasonings, you won't notice that you're eating mushrooms and spinach too. ;)
Pin It

Thursday, February 24, 2011

Peanut Butter Banana Wraps

I don't know about you but I am in a hurry most mornings.  I don't ever have time to actually eat breakfast at home; I'm usually eating in the car or as soon as I make it to the office (if I can hold out that long).  And when it comes to breakfast, I really like to have some protein so I can make it as close to lunchtime as possible without snacking.  So my breakfasts typically consist of some kind of oatmeal concoction, hard-boiled eggs, yogurt with granola, etc.

I found this wrap recipe though and thought "what a perfect breakfast (or snack) to eat on the go!"  And it's also great to make a couple of these at a time, toss one in the fridge for another day that's even more hectic than usual.

Peanut Butter Banana Wraps
Recipe adapted from So Easy

2 tortillas
4 tbsp peanut butter
1 large banana, sliced
10 dried figs, sliced
Cinnamon

1. Lay the tortillas on the counter and spread a couple tablespoons of peanut butter on each.  Top with half a banana and five figs per tortilla.  Sprinkle with a little cinnamon.

2. Carefully roll up each tortilla and wrap in plastic wrap.

Feel free to use whatever dried or fresh fruit you like.  I happen to have a thing for dried figs (I feel like I'm eating Fig Newtons...YUM!) but if you like cranberries, raisins, apricots, pineapple, whatever, go ahead and use those instead.  Not a fan of bananas?  No problem!  Try a different fresh fruit instead.  That's what I like about these kinds of recipes.  They're really not so much recipes as concepts: understand the concept and the flavor combination sky is the limit.  So try it out and let me know what you think. :)
Pin It

Wednesday, February 23, 2011

Fully-Loaded Cheesey Potato Soup

Have you ever had one of those days where you get home and all you want is a big steamy bowl of That Soup.  So you go to your pantry, only to discover you don't have enough of That Star Ingredient to pull of That Soup?  Yeah, even with as much as I try to plan, this happens to me.  When it does, I figure I have two options:

1) Pick up your car keys and drive the 3 minutes to the grocery store, wait 10 minutes in line to check out and grumble to yourself about how you could have possibly miscalculated your ingredients for the week.

OR

2) Live on the edge.  Take a look at what else you've got in the house and see what other kind of soup you can make instead.
 Look what goodies I found!

Normally, I go with option 1.  I'm a planner and I have a set plan to make That Dish so I'm going to get the stuff for That Dish, like it or not.  However the other day I decided to throw caution to the wind and go with option 2.  I mean, really, how hard can it be, right?  I have butter/oil, onions, chicken stock, various frozen vegetables,...plenty of ingredients to come up with an alternative soup!  And so I quickly dug through my soup recipes and found one I'd filed away to try but have never gotten around to making.  Now was the time!

And boy, oh boy, I totally need to forget about ingredients more often!

Fully Loaded Cheesey Potato Soup
Recipe adapted from the Neely's

4 tablespoons butter
1 onion, finely chopped
2 carrots, finely chopped

2 cloves garlic, finely chopped
1/4 cup all-purpose flour
Salt and freshly ground black pepper
3 cups chicken stock
1 cup milk
12 oz beer (about 1 1/2 cups)
2 large russet potatoes, peeled and chopped
2 cups grated extra-sharp Cheddar (about 8 ounces)
Dash hot sauce
Dash Worcestershire

1.  In a large saucepan over medium heat, melt the butter. Add the onion, carrot, celery, and garlic and saute in butter until the vegetables begin to soften, about 4 minutes. Sprinkle the flour into the pan and continue to stir for 2 minutes to toast the flour. Add salt and pepper, to taste. 

2.  Gradually whisk in the stock, then the milk and the beer. Stir in the potatoes and bring the soup to a boil. Reduce the heat and simmer the soup until the potato is tender, about 20 to 30 minutes. Try not to drool too much at the AMAZING smells that will begin to permeate your house.

3.  Remove the pan from the heat and using an immersion blender, puree the soup until smooth. [Note: Don't have an immersion blender?  Ladle soup into a regular blender or food processor instead.  Return soup to pot when smooth.]  Return the soup to low heat. Add the cheese a handful at a time, stirring until melted and smooth after each addition (if you add it all at once, you get cheese glops; trust me on this one). Season the soup, to taste, with hot sauce, Worcestershire, and salt and pepper. 
 Have I mentioned before that we like cheese?  Because we do.

To make this "Fully Loaded" top with any fixings you like on your baked potato.  We agreed that crispy bacon and some fresh chives would be awesome on this.  I also liked it with just some extra hot sauce on top (I like spicy).
Pin It

Tuesday, February 22, 2011

Granola Bars

Playgroup Granola Bar

I received an interesting request based off my granola post last week.  Loose granola is great, but do I have any granola bars recipes?  Hmmm, to be honest I'd never really thought about making my own granola bars and I'm really not sure why.  I love granola bars!  They have all the goodness I love about granola but in this handy little To-Go package.  I realize that I don't very often buy granola bars because of the price, plus I don't love all the sugar that's typically in most of the bars I can afford.  What's a girl to do?

Time to research some recipes!!

I found two that looked intriguing so over the weekend I made them both, hoping to whittle it down to one that I could share with y'all.  Um...ran into a little "snag" though....we ended up liking both recipes!  The first I found on AllRecipes.com and is SUPER easy to put together and PERFECT for any little budding Food Network Stars you have running around your house.

Playgroup Granola Bars are wonderful if you need some snacks on-hand but are short on time.  There's no chopping involved; just toss everything into the bowl and mix up with your hands.  How easy is that??  And because it bakes in a 9x13 pan, you'll have quite a few bars to stack up in your pantry.  I also really like this recipe for it's flexibility.  I feel like I can play around with adding other ingredients (nuts, chocolate chips...) or making swaps (craisins for raisins?) without significantly affecting the finished bar.  One change I will definitely play with is cutting back on the sweetness.  These bars are great but almost taste like an oatmeal raisin cookie to me.  So I may dabble with cutting back the amount of brown sugar in my own variations.  Definitely try this one out though and see what you think of it!


The other bar I tried is absolutely one I'll make again, and possibly double the recipe!  It's a Walnut-Cherry bar and sooooo yummy!!  I could be biased though because walnuts are my favorite nut and who doesn't love cherries?  There is some chopping and toasting involved with this one so it's a smidge less kid-friendly than the previous recipe.  It also doesn't make as many bars so if quantity is your goal I recommend doubling this.  On the bright side, this one has way less sugar but does not sacrifice on that yummy sweet taste, thanks to the cherries.

Walnut-Cherry Bars
Recipe adapted from So Easy


1 cup quick cooking oats
3/4 cup whole wheat flour
1/4 cup toasted wheat germ
1 tsp ground cinnamon
1/4 tsp salt
1/2 cup honey
1/3 cup unsweetened applesauce
1/4 cup canola oil
1 large egg, beaten to blend
1 large egg white
3/4 cup chopped dried tart cherries
1/2 cup finely chopped walnuts
Cooking spray

1. Preheat the oven to 350.  In a medium bowl, whisk together the oats, flour, wheat germ, cinnamon, and salt.


2. In another bowl, whisk together the honey, applesauce, oil, egg, and egg white until well combined.  Stir in the oat mixture until well combined.  Add the dried cherries and walnuts.

3. Coat an 8-inch square baking pan with cooking spray.  Spread the mixture in the prepared pan and back until a toothpick inserted in the center comes out clean, 30-35 minutes.  Cool and cut into bars (recommended: 12 bars).
 
Walnut & Dried Cherry Bar
I always know I did something good in the kitchen if 1) my son INHALES the result, and 2) my husband asks me to make it again (actually, he usually says something like "you can make these again").  So guess what I'll be stocking in my pantry from now on. ;)
Pin It

Monday, February 21, 2011

Get Ahead: Mushroom Spaghetti Sauce

First, let's clarify something... all my life I have hated mushrooms.  Then a few years ago I began to somewhat tolerate mushrooms as long as they were small and in a sauce of some kind.  Then probably last summer I just decided to admit the inevitable: I kinda, sorta like mushrooms now.  The texture can still be a little goofy at times, but I'm enjoying playing around with them as much as my anti-mushroom husband will allow.

All this being said, I also want to make clear that I've been making this particular spaghetti sauce for years.  Yes, you're following me correctly.  I've been making a mushroom spaghetti sauce for mushroom-haters for quite some time.  I hope at this point any mushroom-haters reading this will at least be intrigued enough to check out the recipe.  Seriously, it's good and I PROMISE you will not be able to tell there's mushrooms in it.

Mushroom Spaghetti Sauce
Recipe adapted from my Mom

1 lb lean ground beef
1 large onion, chopped
1 container cremini mushrooms
14.5 oz diced tomatoes, undrained
16 oz tomato sauce
12 oz tomato paste
1 cup red wine
1 cup water
1 bay leaf
1 tsp basil
1 tsp oregano
1 tsp garlic powder
1 tsp sugar
1 tsp salt
1/2 tsp chili powder
1/4 tsp pepper

1. In a Dutch oven, brown beef and onions until beef is no longer pink.  Drain grease.


2. While beef mixture is cooking, use a damp cloth to gently wipe off any dirt on the mushrooms [Note: do NOT run mushrooms under running water!  Mushrooms are little flavor sponges; rinsing them under water means they will soak up the flavor of...well, water].  Break mushrooms apart a little and toss into food processor.  Process until they almost have a paste consistency and look similar to ground beef.  Add to Dutch oven and let cook until the mushroom water begins to evaporate.
 Can you see any mushrooms in this?

3.  Add remaining ingredients and bring to a boil.  Reduce heat and simmer uncovered for 1 hour.

4.  Remove bay leave and serve over hot cooked spaghetti.  Sprinkle with Parmesan cheese, if desired.

The reason I think is of this as a "get ahead" recipe is that I typically make this on a weekend, sometimes doubling the recipe, and freeze it in 3-4 cup portions for weeknight dinners.  I absolutely love this sauce but who has an hour and half at the end of a long day to make good, old-fashioned spaghetti sauce?  Not me!  So I like to take advantage to poor weather, nap times, or just the desire to make something super homey.  Try it out....I don't think you'll be disappointed! :)
Pin It

Friday, February 18, 2011

Buttermilk Pancakes with Berry Pomegranate Syrup

When I was a little girl, I remember waking up ungodly early on Saturday mornings and running to the family room to start the traditional Cartoon Marathon.  An hour or so later my mom would enter the kitchen and start the coffee.  Eventually, my brother and I would get the much-anticipated question of the day: what would you like for breakfast?

The answer was always multiple choice.  We could have pancakes (Mom's favorite), waffles (my favorite), or french toast (oh man, does anyone not like bread soaked in custard and then fried??).  Most of the time it was pancakes but no matter which option won, Saturday morning breakfasts at our house ROCKED!


So it kind of goes without saying that in my own house now, we love Love pancakes.   And since having my son, I've really been trying to duplicate that same Saturday morning experience that I had for him.  He pretty much does a happy dance over whatever breakfast food I make but nothing comes close to PANCAKES.


Everyone knows how to make pancakes, right?  Flour, some kind of sweetener (sugar, honey, etc), leavening ingredients, wet ingredients, yadda, yadda, yadda.  Some days I think I have a bottomless pit of pancake recipes that I like to try out or play with, however when it comes to buttermilk pancakes, there is only one recipe I go to.  It is so beloved in fact that I have to double the recipe to feed the three of us.  I'm not proud of that fact, but there it is.  Yeah....


2 cups all-purpose flour
4 tbsp sugar
2 tsp baking powder
1 tsp baking soda
1/2 tsp salt
2 cups buttermilk
2 large eggs
2 tsp canola oil

1. In a large bowl, whisk together the flour, sugar, baking powder, baking soda, and salt.  Make a well in the middle and set aside.

2. In a medium bowl, combine the buttermilk, eggs, and oil.  Pour the wet ingredients into the flour mixture.  Whisk to combine (be careful not to over mix; lumps are not the end of the world).


3. Preheat a griddle over medium heat.  If you want that extra-crispy, omg-this-is-like-crack texture around the edges, I suggest greasing the griddle with a little canola oil or butter in between each batch of pancakes.  If that crispiness isn't something you go for, then spray the pan with a little cooking spray to make sure they don't stick.

4. Using a 1/4 cup measure, scoop the batter onto the griddle, flipping after bubbles form and the edges look cooked.  Keep cooked pancakes warm in either a 200 F oven OR on a plate covered in foil.


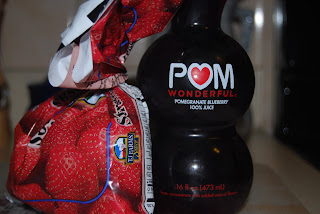
These are really good but this is a pretty basic recipe.  Right?  Right.  So I was feeling adventurous and wanted something to jazz up the pancakes a little bit.  Well, at the store the other day I discovered pomegranate juice on sale (Omg that NEVER HAPPENS!!) and so picked up a couple bottles.  I also remembered a cooking show I saw a while back where someone made a pomegranate syrup simply by boiling pomegranate juice until it had reduced and thickened.  Dude, I can totally do that!  And oh look, wouldn't you know that the juice I got is blueberry pomegranate AND I happen to have some strawberries in the freezer that I have GOT to use up.  Winner!


Berry Pomegranate Syrup
1 bottle blueberry pomegranate juice
1/2 bag frozen strawberries (thaw them if you have time and want to, otherwise don't worry about it)


1. Pour strawberries and juice into a small saucepan.  Cover and bring to a boil over medium-high heat.

2. Once it boils, remove the lid, reduce the heat a bit so it doesn't boil over and continue to let this bubble away until it's reduced by at least half.  Head's up: this could take a while so I'd allot at least 30 minutes for this.  Start the syrup before you start the pancakes.


3. Generously ladle over hot pancakes.  Gloat over the fact that your child gleefully prefers this over bottled pancake syrup that you know contains corn syrup, butter flavoring, and God knows what else.
Pin It

Thursday, February 17, 2011

P is for...

Every week in my son's preschool class, they learn about a new letter of the alphabet.  This week is the letter P.  Like most parents in similar situations, when it's show and tell day and you're wracking your brain for anything that might start with the letter P, you begin to get creative.  P is for penguin, pistachio, Perry the Platypus, pine cone, pin cushion, and pizza.  In all this thinking about P this week, it occurred to me that P is also for Plan.

I've been asked before how I pull together the meals I do each week.  Honest truth?  I plan for it.  In my first apartment in college, I didn't do a whole lot of actual meal-planning.  I was young and didn't always feel like making a big production out of cooking just for myself.  When I got married though and had more than just myself to think about, I started figuring out the best way to plan meals for us.

First thing I had to figure out is just how often do I want to find myself at the grocery store?  I'm not one of those people who can make a run every day or every other day (good gracious I'd go crazy!).  I do like to have lots of fresh produce on hand so a monthly trip is out of the question.  Even going every two weeks would be pushing it... so a weekly trip it is!

Once I'd established that I'd get fresh groceries each week, I needed to decide how many meals that meant I would cook.  I'm a HUGE fan of leftovers, plus I do like to eat out on occasion.  So I aim to actually cook between four and six dinners each week.  At least one night is designated for leftovers and another for frozen pizza, takeout, or just plain eating out (don't care what we do, as long as I'm not cooking). 

Now it's finally time for the fun part...the recipes!!  I subscribe to a variety of e-newsletters and magazines.  I have a respectable cookbook collection.  I'm addicted to food shows.  Plus I haunt certain foodie websites.  Oh and Google.  Sometimes I get the best results just from googling a recipe idea.  But I digress...  I pick out the things I feel like making, WRITE THEM DOWN, and make note what ingredients I might be missing.  That whole writing thing is crucial.  In the early days of our downtown apartment, I kept the weekly meals on a dry erase board on the fridge.  That has now evolved to keeping the meal plan on the family calendar.  Yup, the same place I write down dentist appointments and class parties.  One central location, I like it.
This is one of those Mommy-Planner calendars.  Each person has their own row...we're tracking Gavin's good behavior with stars if you couldn't tell. ;)


Making the grocery list can be easy but hard.  Writing down missing ingredients is one thing but keeping up pantry and fridge stock?  Ugh.  Not my favorite thing to do.  Plus, what about meals you don't plan for?  Dinner may get most of the glory by there's still breakfast, lunch, and snacks that need to be accounted for.  Ack!  Sometimes it's overwhelming.  Yes, I said it.  Me, the one who loves to grocery shop gets overwhelmed with it all.  I think it's ok to admit that sometimes. ;)

Anyway, for that list, I start it out in a couple different places.  I keep a list on the fridge by the calendar.  That way as I use up ingredients I can right away write them down to replace.  My husband can also easily add things he needs.  I will also write things down on scrap paper at work as ideas come to me (oh man, you don't want to see how crazy my purse can get with all that scrap paper!).  Eventually though, it all gets transferred to one easy place: my phone.  Yeah, there's an app for that!
 Isn't this just so cool??


I'm a fan of the grocery list app on my phone.  No paper and pen to keep track of anymore.  Just bring it on my phone, and tap things off my list as I toss them in the cart.  Easy!  Best part is though I can also e-mail the list to my husband if I need him to do the shopping instead. 


So there you have it.  How I keep my crazy self somewhat organized enough to make different things each week.  Some days it's fun, other days it's a chore.  But most of the time I love it.  Because I really do love to cook, experiment, create.  I love filling my home with good smells and tastes.  And as long as I focus on that love, these little food chores like planning and list making don't seem so bad at all. :)
Pin It

Wednesday, February 16, 2011

Get in my belly!


Do I have your attention?  Yup, thought so.  Don't you think all recipes should start with bacon?  I do.  That would just be oh-so-lovely.  *sigh*  A girl can dream...
A little spinach to ease any guilt caused by that lovely bacon

I keep hearing about carbonara and how comforting it is.  Every time I watch a cooking show and they make this dish, they mention how easy it is to put together.  First time I tried to make carbonara...well, it wasn't quite the mass of easy comfort I'd imagined it would be.

And then I got 5-Ingredient Fix cookbook for Christmas.  Yup, every recipe has five ingredients or less!  Love it!!  So here's this very un-intimidating version of carbonara.

1/2 lb slab bacon, cut into half-inch chunks
1 lb fettuccine
1 large egg, plus 2 large egg yolks, at room temperature
1 cup grated Parmesan, plus more for garnish
2 tsp freshly cracked pepper
[if you're not familiar with these recipes, salt, pepper, and water are "freebie" ingredients and don't count]
2 cups baby spinach leaves

1. Bring a large pot of water to a boil and salt generously.

2. Put the bacon in a large skillet and cook over medium-high heat until crisp, about 10 minutes.  Remove the skillet from the heat.

3. When the bacon is halfway cooked, drop the pasta into the boiling water and cook according to package directions.  Remove about 1 cup of pasta water before draining pasta.  Set aside.


4. While pasta cooks, whisk the egg, egg yolks, 1 cup Parmesan cheese, and pepper in a small bowl.  If the mixture is too thick, slowly whisk in up to 1/2 cup of the hot pasta water.
 If your egg and cheese mixture looks like this, add the water

5. Return the bacon-drippings skillet to medium heat and carefully pour in 1/2 cup pasta water.  When it's very hot, remove it from the heat and add the hot pasta, tossing with tongs to coat.  While tossing continuously, slowly drizzle the egg mixture over the pasta until it's completely coated.  If the pasta is not still steaming hot, return the skillet to low heat while tossing.  Add more cooking water if the pasta seems dry.
 See that creaminess?  Oh yeah, that's what we're going for!

6. Toss the pasta with the spinach leaves until evenly distributed.  Serve immediately with more cheese sprinkled on top.

I learned there are two keys to making good carbonara.  One, you want to keep the pasta HOT as you're working this dish together.  Two, when you're working with raw eggs and HOT ingredients, you'll want to temper the eggs or you'll end up with scrambled eggs instead of creamy sauce.  Whisking hot water into the eggs helps.  Also as you add the egg mixture into the pasta, do so sloooooooooowly and keep the pasta moving with tongs.  Honestly, this is about as complicated as it gets and it's totally doable.  Yeah, it means using both hands at the same time which can sometimes feel totally weird but you can do this.  I promise. :)
Pin It

Tuesday, February 15, 2011

Nuts about Granola!

I love granola...especially with raisins and nuts.  Granola is crunchy.  Granola is filling.  Granola can be a fancy dessert (think fresh fruit yogurt parfait).  Granola can be a simple Tuesday morning breakfast (think bowl and milk).  Granola can also be expensive.  Sometimes I'd walk through the cereal aisle, checking out what might be on sale, and if I saw any box of granola for under $3 I'd do a MAJOR happy dance.  Really?  $3?  Wow, pathetic.  Oh and then there's the organic aisle.  Can't forget the granolas in the organic aisle...I discovered this one that had almonds and dark chocolate in it that is to DIE for!  And I almost died over the price too.  Why does all of the tasty good-for-you stuff have to be so damn expensive???  Argh!

Yeah, I'm freaking out over a breakfast cereal.  Sorry about that.  I get a little excited about this sometimes.  I did warn you about that right?  Right. 

So granola was at one time relegated to a luxury item in our house, something only purchased when on extreme sale.  And then I was looking through one of my favorite cookbooks and stumbled across Nutty Granola.


Not only is this recipe easy, quick, and healthy, but it's DELICIOUS and CHEEEEAAAAP!


3 cups old-fashioned oatmeal
1/2 cup chopped walnuts
1/2 cup chopped pecans
1/2 cup chopped almonds
1/2 cup raisins
1/2 cup maple syrup
1/4 tsp ground cinnamon
1/4 tsp salt
[Did you notice the lack of a fat ingredient, like butter or oil?  Yeah, I did]

1. Preheat oven to 300.

2. In a large bowl, combine all ingredients and toss to combine.


3. Spread mixture on a lightly greased baking sheet in a single layer.  Bake for 30 minutes, stirring once.


4. Let cool and store in an airtight container.  If you're lucky this will last a week.  If you're in my house and have a granola-crazy son in addition to your own granola-crazy self, I give it about 3 days.
Pin It

Monday, February 14, 2011

The Way to a Man's Heart...

The other day I asked my husband what he would like for Valentine's Day.  Like most men I know, he's really hard to shop for.  I mean really.  So I thought I'd just ask him what he'd like to get.  And what does my wonderful hubby tell me?  Nothing.  No, literally I mean he doesn't want anything.  Well now how fair is that??  I cannot, in good wife conscience, allow him to let me not get him anything!  That's just wrong.


I may not have clue as to what to buy for him, but I can cook him a really good dinner.  In the past, I've tried to make fancy, oo-la-la seafood-type Valentine's Day dinners.  They usually turned out ok.  However I married a truly Committed Carnivore.  This time, I want to make something that would really go to my man's heart.

Marinated Flank Steak with Blue Cheese Sauce
Recipe adapted from So Easy

3 tbsp olive oil, divided
1 tbsp balsamic vinegar
1 tsp brown sugar
2 cloves garlic, minced
1 1/4 lbs flank steak
Cooking spray
1 medium onion, cut into 1/4-inch think rounds
Salt and pepper
3 tbsp crumbled blue cheese
3 tbsp lowfat buttermilk
Dash of Worcestershire sauce

1. In a small bowl, whisk together 2 tbsp of the olive oil, the balsamic vinegar, brown sugar, and garlic.  Put the steak into a resealable plastic bag with the marinade and put in the fridge for at least 1 hour and up to 8 hours.  Allow the meat to come to room temperature before cooking.  Pat meat dry before cooking.

2.  Preheat broiler.  Brush both sides of the onion slices with the remaining tbsp of oil and season with salt and pepper.  Broil until they are softened, about 6 minutes per side.  Separate into rings and set aside.


3. Remove the meat from the marinade and season both sides with salt and pepper.  Discard the marinade.  Broil for about 5 minutes per side for medium rare.  Let rest for 5 to 10 minutes before slicing thinly on the bias.


4. In a small, combine the blue cheese and buttermilk with a fork, mashing until creamy.  Stir in the Worcestershire sauce.


5. Serve steak with the onions and drizzle with blue cheese sauce.

When I first read this recipe, I thought for sure it was a weekend-only kind of recipe.  Then I read it more closely and saw it was totally doable for after work.  The marinade takes literally two minutes to assemble and pour over the steak.  The meat takes 10 minutes to cook, with another 10 to rest.  Throw in a bagged salad and some crispy rolls?  Weeknight Valentine's Day dinner in under 30 minutes!

So now I have a happy hubby with a happy tummy, and that makes this wife very, very happy indeed. :)
Pin It