Anyway, last week we went out and picked strawberries. A lot of strawberries. Dare I say a CRAP-TON of strawberries. I'm looking at my refrigerator now and really questioning my sanity. But this is what I wanted, I remind myself. I have one son who inhales PB&J sandwiches like they're candy, and another who will probably be the same or pretty close. I need to start stockpiling.
Strawberry Jam
Recipe from the box of Sure-Jell
About 8 cups whole strawberries, washed and hulled
4 cups sugar
1 box Sure-Jell OR 6 tbsp fruit pectin
NOTE: This is the canning version. If you don't have canning equipment please do NOT let that stop you from making your own jam!! Sure-Jell also has recipes and instructions to make freezer jam, which I've done before and it's AMAZING.
 |
| To just make a batch or two, buy a box. To make more jam, get a jar of pectin. |
1. First thing to do is crush the strawberries. You can either do this with a potato masher, 1 cup at a time, or with a food processor. If you use the food processor, pulse the berries a few times, making sure to not overdo it. You want a few chunks in your jam. Your goal is to end up with 6 cups of crushed berries.
 |
| I like lots of berry chunks in my jam. |
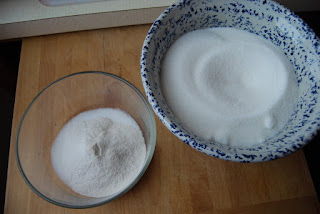
2. Carefully measure out the sugar into a bowl. Scoop 1/4 cup of that sugar into a separate, smaller bowl and mix in the pectin. [NOTE: Yes, you do want to measure out the sugar into a bowl, ready to go, and not have to waste time scoop it in later when you need it fast.]
 |
| Left, pectin mixture. Right, just sugar. |
3. In a large stockpot, combine the berries, and sugar/pectin mixture. Bring to a boil over high heat, stirring constantly.
4. Once the jam reaches a rapid boil (yes, while still stirring), quickly pour in the remaining 3 3/4 cups sugar. Stir to combine and boil for exactly one minute more. Remove the jam from the heat and skim the foam off the surface.
 |
| Foamy |
 |
| Not quite so foamy. |
See? That's not so bad is it? Making jam is totally doable. And you can store it in a variety of ways: freezer containers or by canning. Freezer jam is easier to make, but canned jam is easier to store. So, if you feel up to learning to can, keep reading:
1. Fill your canning pot with enough water that once your jars are submerged, they will be covered by 1-2 inches. Cover and bring to a boil. FYI, this could take 30-60 minutes depending on the size of your pot.
2. Make sure your jars are sterilized. You can do this by dipping them in the boiling canning water OR by running them through the dishwasher, especially if you have a Sanitize setting. SIDE NOTE: If you are going to put the jam in the glass jars immediately after making it, make sure to sterilize the jars right before filling them. Putting a hot substance into cold glass containers is a recipe for disaster.
3. Fill each jar to within 1/4" to 1/8" of the top. Wipe the rims with a damp cloth before topping with a two-piece lid (that's the flat circle thingy and the separate metal rim). Screw the rim down to just gently tighten. No, you don't want jam to escape or water to get in, but you also want air to escape from the jar. Trust me, bad things happen if you tighten the lids too much before processing. More about that tomorrow.
4. Stack the jars around the rack and submerge. Boil the jars for 10 minutes, adding more time as necessary based on your elevation.
5. Carefully remove the jars from the pot with tongs and put on either a wooden cutting board or towel-covered cabinet. Again, we're trying to avoid a scenario of an extreme temperature change with these glass jars. Let the jars sit out for 24 hours. Then tap the button in the middle of each lid. If it stays down, CONGRATULATIONS! You did it!! If the button pops back up, YAY you get to eat jam right now!! Or you can toss those jars in the freezer. Either way is fine.
The canned jam will keep for up to one year on the shelf. Frozen jam will keep for about the same amount of time.
Now, let's talk about what reasons you may have for NOT making jam:
- I have no need to make so much jam. No problem! They make little packets of pectin that result in only a couple jars worth of jam.
- I am NOT spending my precious time standing over a hot stove and stirring! Two words for you: instant pectin. Also, you may want to consider using smaller fruit that requires less prepping to make your jam. OR you could take some time to prep your fruit one day, and make the jam the next.
- Ok so I have a little bit of time, but no way do I have an entire day's worth to can. Nobody said you have to can the same day you make the jam. I promise you will not spend an eternity in Jam Hell for making the jam one day, pouring it in a bowl, and canning it a day or two later. It really is ok!
- I'm too intimidated to can, but I still want to make enough jam for the coming months. Two years ago I was terrified of canning. Then my mother-in-law told me about freezer jam. So I got my little box of Sure-Jell, crushed my berries, sterilized my Ziploc containers in the dishwasher, and was popping my jam into the freezer a mere two hours after I started.


No comments:
Post a Comment