Wednesday, July 27, 2011

Pepperoni Pizza Puffs

Have you ever had a hankering for just a little taste of something?  Not a whole huge helping or anything, but just a bite or two would totally satisfy.
I love all the flavors in my pizza seasoning


If that little something tends to be pizza, then these are totally up your alley.
Truth: I just eyeball the amount of cheese.


Pepperoni Pizza Puffs
Recipe adapted from Rachael Ray
 
3/4 cup flour 
3/4 tsp baking powder 
3/4 tsp pizza seasoning (or Italian seasoning, or dried oregano with a little crushed red pepper mixed in)
3/4 cup milk 
1 egg, lightly beaten 
2 oz mozzarella cheese, shredded (about 1/2 cup) 
2 oz cheddar cheese, shredded (about 1/2 cup) 
4 ounces turkey pepperoni, chopped (about 1 cup) 

1.  Preheat the oven to 375°. Grease a 24-cup mini-muffin pan. In a large bowl, whisk together the flour, seasoning, and baking powder; whisk in the milk and egg. Stir in the cheeses and pepperoni; let stand for 10 minutes.
Make life easier: use a melon baller or cookie scoop for this


2.  Stir the batter and divide among the mini-muffin cups. Bake until puffed and golden, 20 to 25 minutes.
Aren't they cute??


These adorable little puffs are good enough to nibble on as-is.  But if you feel like taking this up a notch, heat up some marinara sauce for dipping. Soooo good!
Pin It

Monday, July 25, 2011

Vegan Mango Banana Bread

We pretty much have to have bananas in our house at all times.  It's a fruit, so guaranteed that Gavin wants it.  It's good for you so I should have them around for just that reason.  And they come in their own natural packaging, which makes them travel-able.  Gotta love something you can just grab & go, right?  Right.

The problem with bananas though is the Ripe Factor.  Once the spots appear, I swear by the next day they're almost completely brown.  And once they're brown, forget it...no one touches them.  Now, any good little baker knows that brown bananas are absolute perfection for banana bread.  But sometimes, I get tired of just banana bread.  Sure I can mix things up a little and make banana walnut bread (woo) but...meh.  Yeah, bored.

This is so not boring.

Vegan Mango Banana Bread
Recipe from Joy the Baker

3 medium or 2 large ripe bananas
1/4 cup vegetable oil
1/2 cup brown sugar
2 teaspoon pure vanilla extract
2 cups all-purpose flour
1 teaspoon baking soda
1 teaspoon ground cinnamon
1/2 teaspoon ground ginger
1/2 teaspoon salt
1 ripe mango, sliced into chunks

1.  Preheat the oven to 350 degrees F. Lightly grease and flour a 9 x 5-inch loaf pan.

2.  In a large mixing bowl, mash the bananas well. Add the sugar, oil, and vanilla extract, and whisk briskly to incorporate.
I love the color contrast of the white flour and warm spices


3.  Sift in the flour, baking soda, spices, and salt. Use a wooden spoon to mix until the wet and dry ingredients are just combined.  Fold in mango chunks.
MANGO!


4.  Transfer the batter to the prepared pan.  Bake for 45 to 50 minutes. The top should be lightly browned and a knife inserted through the center should come out clean, or with just a few crumbs.
I feel like these happy yellow tidbits should be smiling at me


5.  Remove from the oven and let cool for 20 minutes before transferring out of a pan and onto a wire rack to cool completely.  Banana bread will last, wrapped at room temperature, for up to 5 days

Sooooo, I would have a picture of the baked bread...I should.  I really should have snapped a shot of it.  But....... we ate it too fast.  Sorry!  Yeah, so you're just going to have to bake some to know just how cute and DELICIOUS this bread is. 

Pin It

Thursday, July 21, 2011

Oatmeal "Mommy" Cookies

This one is going out to all the new mommies and soon-to-be new mommies in my life!  Why just the mommies?  Because, dear friends, these cookies will help increase a nursing mommy's milk flow.  Yes, really.

These cookies are so tasty, so easy to make, and REALLY DO HELP that I just had to post this.  Even at the risk of making myself look like a bigger weirdo than I already am.  :)

Yeah, this is a phone picture...sorry for the blurry-ness!

In case you're curious, the secret ingredient in these cookies that helps you make more milk for Baby is the brewer's yeast.  Yup, the same kind of yeast they use to make beer (which supports why they say a little beer is good for breast milk).  This combined with the oatmeal, flax seed meal, and whole wheat flour really go a long way if nursing is in your game plan.

If you're not a mommy, or have no intention of breastfeeding an infant ever, feel free to leave out the brewer's yeast and enjoy what a delightful, chewy sweet cookie this is.

Oatmeal "Mommy" Cookies
Recipe adapted from here
 
1/2 cup butter (one stick), softened
1/2 cup unsweetened applesauce  
1 cup granulated sugar 
1 cup firmly packed brown sugar  
4 tbsp water  
2 tbsp flax seed meal  
2 eggs  
1 tsp vanilla  
2 cups whole wheat flour  
2-4 tbsp brewer's yeast
1 tsp baking soda  
1 tsp salt  
3 cups oats [NOTE: I used old-fashioned but quick-cooking would be fine too] 
1 cup chocolate chips, or whatever you feel like tossing in that day  

1.  Preheat oven to 350°.

2.  Mix the flax seed meal and water together in a small dish.  Set aside for 3-5 minutes.
Moistening the flax seed meal


3.  In a large bowl, cream together the butter, applesauce, and both sugars.  Beat in eggs, mixing until well combined.
I like being able to sub in a little applesauce for fat ingredients


4.  Add flax seed and vanilla; beat well.

5.  In a medium bowl, sift together the flour, brewer's yeast, baking soda, and salt.  With the beaters running, slowly add the dry ingredients to the wet, mixing just until combined.
Ooooohhhh cookie dough....


6.  Stir in the oats and chocolate chips.
The cookies almost look healthy here!  Almost.


7.  Using a tablespoon or melon baller, scoop cookie dough onto greased baking sheets, about two inches apart.  Bake for 10-12 minutes.  Let cool 2 minutes on baking sheet before removing to wire racks.
Ready for baking


Couple things... the brewer's yeast is probably a new one for you.  It was for me!  It is also known as Nutritional Yeast.  I bring this up because you may have some difficulty finding it.  Check out the health food section of your grocery store, or hit up one of those organic stores like Whole Foods.  When you do find it, be aware that there are a lot of other uses for this yeast besides cookies and beer.  Brewer's yeast is an excellent source of B vitamins, among other things.  So feel free to stir a little of this into your smoothies or pancake batter.  You won't taste it but will reap the benefits of it being there.

Also, I'm not really a chocolate-chip-oatmeal-cookie kind of girl; I generally prefer the old-fashioned raisin.  However my friend made these for me with the chips and HOLY COW are they good!  Obviously from my pictures, I decided to try dried cranberries in this batch, just because I have so much....and I like cranberries.  Toss in whatever you have on hand though: chocolate chips, peanut butter chips, toffee bits, chopped dried apricot or figs or apples.  It's an oatmeal cookie, also known as a BLANK CANVAS.  Play around with it!


Pin It

Wednesday, July 20, 2011

Chicken Biryani

I'm a planner.  You know this, right?  I have to be able to plan out my meals for the week so that I know what to shop for.  Nothing drives me crazier than wanting to make a dish and discovering I'm missing That One Ingredient.  Argh!!

But life has been topsy-turvy though since Kieran was born so my meal planning isn't as stellar as it used to be.  I have a bunch of meals in the freezer but I'm trying to space those out so they last as long as possible.  So there have been days where the calendar remained blank for that day's dinner.  Those days I have all day to obsess about what to make based on what I have available.  Sometimes that's fun.  Sometimes, not so much.

One day I got lucky though.  A friend of mine posted a link to a recipe she was trying out, and in looking it over, I realized that I could make it too WITHOUT heading to the store first!  Excellent!!

Chicken Biryani
Recipe adapted from Confections & Musings 

2 tsp canola oil
1 lb boneless, skinless chicken breasts, cut into 1-inch pieces
1 cup chopped onion (about 1 medium onion)
1 jalapeño pepper, seeded and minced [I made this optional since I didn't have one handy]
1 tsp minced fresh ginger
1 1/2 teaspoons garam masala 
3/4 teaspoon ground cumin
1/2 teaspoon salt
2 garlic cloves, minced
2 cups chopped plum tomato [Or be like me and use a drained can of petite diced tomatoes]
1 cup uncooked basmati rice [I used whatever I had in my pantry canister]
1/3 cup raisins
1 3/4 cup low-sodium chicken stock
1/4 cup chopped fresh cilantro [optional but it REALLY brightens the flavor if you have it]
1/4 cup sliced almonds [optional but that little crunch adds awesome]
4 lime wedges

1.  Heat oil in a large nonstick skillet over medium-high heat. Add chicken to pan; sauté about 3 minutes. Add onion and jalapeño and cook another 3 minutes.
Psst! It's easier to cut up chicken while it's still a little frozen.


2.  Add ginger, garam masala, cumin, salt, and garlic; sauté 30 seconds. Add tomato, rice, raisins, and broth; bring to a boil. Cover, reduce heat, and simmer 15 minutes or until rice is tender.
I keep my ginger peeled and in the freezer.  Lasts longer that way.


3.  Stir in cilantro. Sprinkle with almonds; serve with lime wedges.
Oooohhhhh delicious!

If you don't have Garam Masala on-hand, I'd really recommend getting it.  It's AMAZING and becoming more popular so you should be able to find it with the spices at your grocery store.  Otherwise you probably could make some of it yourself, since it's a blend of cinnamon, cumin, coriander, nutmeg, and other more common spices.

This dish is YUMMY.  So yummy in fact that I cannot wait to make this again, this time using more of the ingredients I felt were optional, especially the jalapeno.  If you aren't a fan of the heat though, leaving it out is just fine.  Because of the blend of spices in Garam Masala, you have this flavor that's somewhere between sweet (from the cinnamon) and spicy, but not HOT spicy.
Pin It

Tuesday, July 12, 2011

Hearty Burritos

I wasn't sure I was going to tell you guys about this one.  I made these a while back and they turned out fine, but not really spectacular.  One the major factors that caught my eye about this recipe though was that I could make, assemble, and FREEZE these burritos to bake up later on.  So since I'd made up a bunch of the filling, I went ahead and froze a few.

Wow, I think these taste better for having sat in my freezer for a couple months!  And sooooo handy too.  Let me tell you that when you're starving, the baby's screaming and refusing to be put down, it's super nice to be able to grab one of these to toss into the oven for a while.

Hearty Burritos
Recipe adapted from my mother-in-law's recipe collection

1 lb ground beef
1 medium onion, chopped
1 pkg (16oz) frozen cubed hash brown potatoes, thawed
1 can (15oz) black beans, rinsed and drained
1 can (14.5oz) Mexican diced tomatoes, undrained
1 cup frozen corn, thawed
1/2 cup salsa
1/2 cup cooked rice [Great use of leftover rice!!]
2 tsp chili powder
1/2 tsp salt
2 cups shredded Cheddar
8 flour tortillas, BIG ones

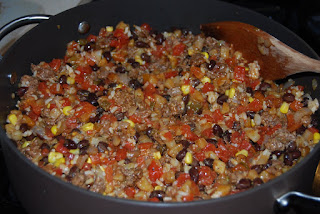
1.  In large skillet, cook beef, green pepper, and onion over medium heat until meat is no longer pink; drain. Add potatoes, beans, tomatoes, corn, salsa, rice, chili powder and salt. Stir to combine. 
Suggestion: stir in some chopped fresh cilantro just before wrapping

2.  Sprinkle 1/4 cup cheese off-center on each tortilla; top with about 1 cup beef mixture. Fold sides and ends over filling. 
Prepare to be wrapped!

3.  Wrap burritos individually in foil and freeze up to 3 months.* Or place burritos seam side down on a baking dish. 
I had 4 to bake, plus 4 to freeze.  Not bad!

4.  Bake at 350 for 25 minutes or until heated through. Serve with preferred condiments. 
Gooey, yummy deliciousness


*Now you really should thaw these overnight in the fridge and then bake as directed.  I'm terrible at the whole "thawing" thing though so if you're like me and grab one of these still frozen solid, let it sit out a while to take the frozen edge off.  Plan on baking it at least 40 minutes to fully heat through.  When you can smell it, it's probably ready to go.
Pin It

Monday, July 11, 2011

Shrimp Scampi

I love fancy-sounding and looking recipes that really take no time at all.  Don't you?


Shrimp Scampi
Recipe adapted from Ina Garten

1 lb (12 to 15 per pound) shrimp
1 1/2 tbsp extra-virgin olive oil
1 tbsp dry white wine
Salt and freshly ground black pepper
6 tbsp unsalted butter, at room temperature
2 tsp minced garlic
1/8 cup minced shallots
1 1/2 tbsp fresh parsley, minced
1/2 tsp fresh rosemary, minced
1/8 tsp crushed red pepper flakes
1/2 tsp grated lemon zest
1 tbsp lemon juice
1 egg yolk
1/3 cup panko
Lemon wedges, for serving

1.  Preheat the oven to 425 degrees F.

2.  Butterfly the shrimp, leaving the tails on. Place the shrimp in a mixing bowl and toss gently with the olive oil, wine, salt, and pepper. Allow to sit at room temperature while assembling the butter and garlic mixture.
The makings for a simple, fantastic marinade

3.  In a small bowl, mash the softened butter with the garlic, shallots, parsley, rosemary, red pepper flakes, lemon zest, lemon juice, egg yolk, panko, salt, and pepper until combined.
Flavortown!  Why yes, I do watch Guy Fieri on occasion

4.  Starting from the outer edge of a shallow, oval or round baking dish (think pie plate or gratin), arrange the shrimp in a single layer cut side down with the tails curling up and towards the center of the dish. Pour the remaining marinade over the shrimp. Spread the butter mixture evenly over the shrimp. 
The butter will melt away, leaving this amazing crust

5.  Bake for 10 to 12 minutes until hot and bubbly. If you like the top browned, place under a broiler for 1 minute. Serve with lemon wedges.
Ooooooooo.....

Now, this is the fancy schmancy version with the whole butterflying action.  If you making this to impress someone, totally go for it because it looks really cool.  However if you're pressed for time, tired, and dealing with cranky, screaming children, I'd just toss the shrimp around in the marinade as is (removing the tails first to make for easier eating later).  Just spread the shrimp in the baking dish in a single layer.
I think shrimp scampi is usually served with angel hair pasta.  A nice crusty loaf of bread works well with this too.  Throw in a lovely tossed salad and you absolutely have a gorgeous, company-worthy weeknight meal.  Enjoy!
Pin It

Wednesday, July 6, 2011

Baked Chicken Teriyaki

Rob and I will literally fight over these leftovers.  Not kidding.  There's been no bloodshed yet but there's usually a nonchalant race to the kitchen to see who can their lunch together first.

Baked Chicken Teriyaki
Recipe from AllRecipes

1 tbsp cornstarch
1 tbsp cold water
1/2 cup white sugar
1/2 cup low-sodium soy sauce
1/4 cup cider vinegar
1 clove garlic, minced
1/2 tsp ground ginger
1/4 tsp freshly ground black pepper
12 boneless, skinless chicken thighs 

1.  In a small saucepan over low heat, combine the cornstarch, cold water, sugar, soy sauce, vinegar, garlic, ginger and ground black pepper. Let simmer, stirring frequently, until sauce thickens and bubbles. 
Today's cast of characters

2.  Preheat oven to 425 degrees. 

3.  Place chicken pieces in a lightly greased 9x13 inch baking dish. Brush chicken with the sauce. Turn pieces over, and brush again. 

4.  Bake in the preheated oven for 30 minutes. Turn pieces over, and bake for another 30 minutes, until no longer pink and juices run clear. Brush with sauce every 10 minutes during cooking. 


Yes, this is a dish that takes a while and you kinda need to babysit.  I'm sorry.  But it's SO WORTH IT!  The frequent basting helps the sauce to slowly penetrate into the chicken and creates this sort of shell that's sweet but salty and tangy and just all around good.  The chicken pieces will literally fall apart as you scoop them out of the pan.  And the sauce?  It thickens into a syrup and a little extra on the chicken and rice is absolute heaven!!
Pin It