Thursday, September 19, 2013

This Week's Menu

I've got a couple of blog posts in the works that I'm trying finish up (and five more after that I'm still roughing out).  I have several crochet orders demanding my attention.  My oldest was sick yesterday so my boys are EXTRA energetic today from being cooped up inside when it was gorgeous outside.  The dog got into an argument with a skunk last night and lost.  I learned that it's difficult to sleep in a house that smells like skunk.

So yeah.  My life is a little wacky right now.  But no matter what, you know I'm still going to get a meal plan together! Because I'm stubborn like that... ;)
  • Saturday: We're helping a friend roof his Goat Shed so I believe a cookout at their house is in the works.
  • Sunday: Grilled tilapia, balsamic kale salad, fresh bread, and some other kind of side dish that I'll come up with later maybe after a trip to the farmer's market.
  • Monday: Meatball sandwiches, a CSA veggie, and oven fries
  • Wednesday: Leftovers
Happy planning!!
Pin It

Thursday, September 12, 2013

CSA Week 8

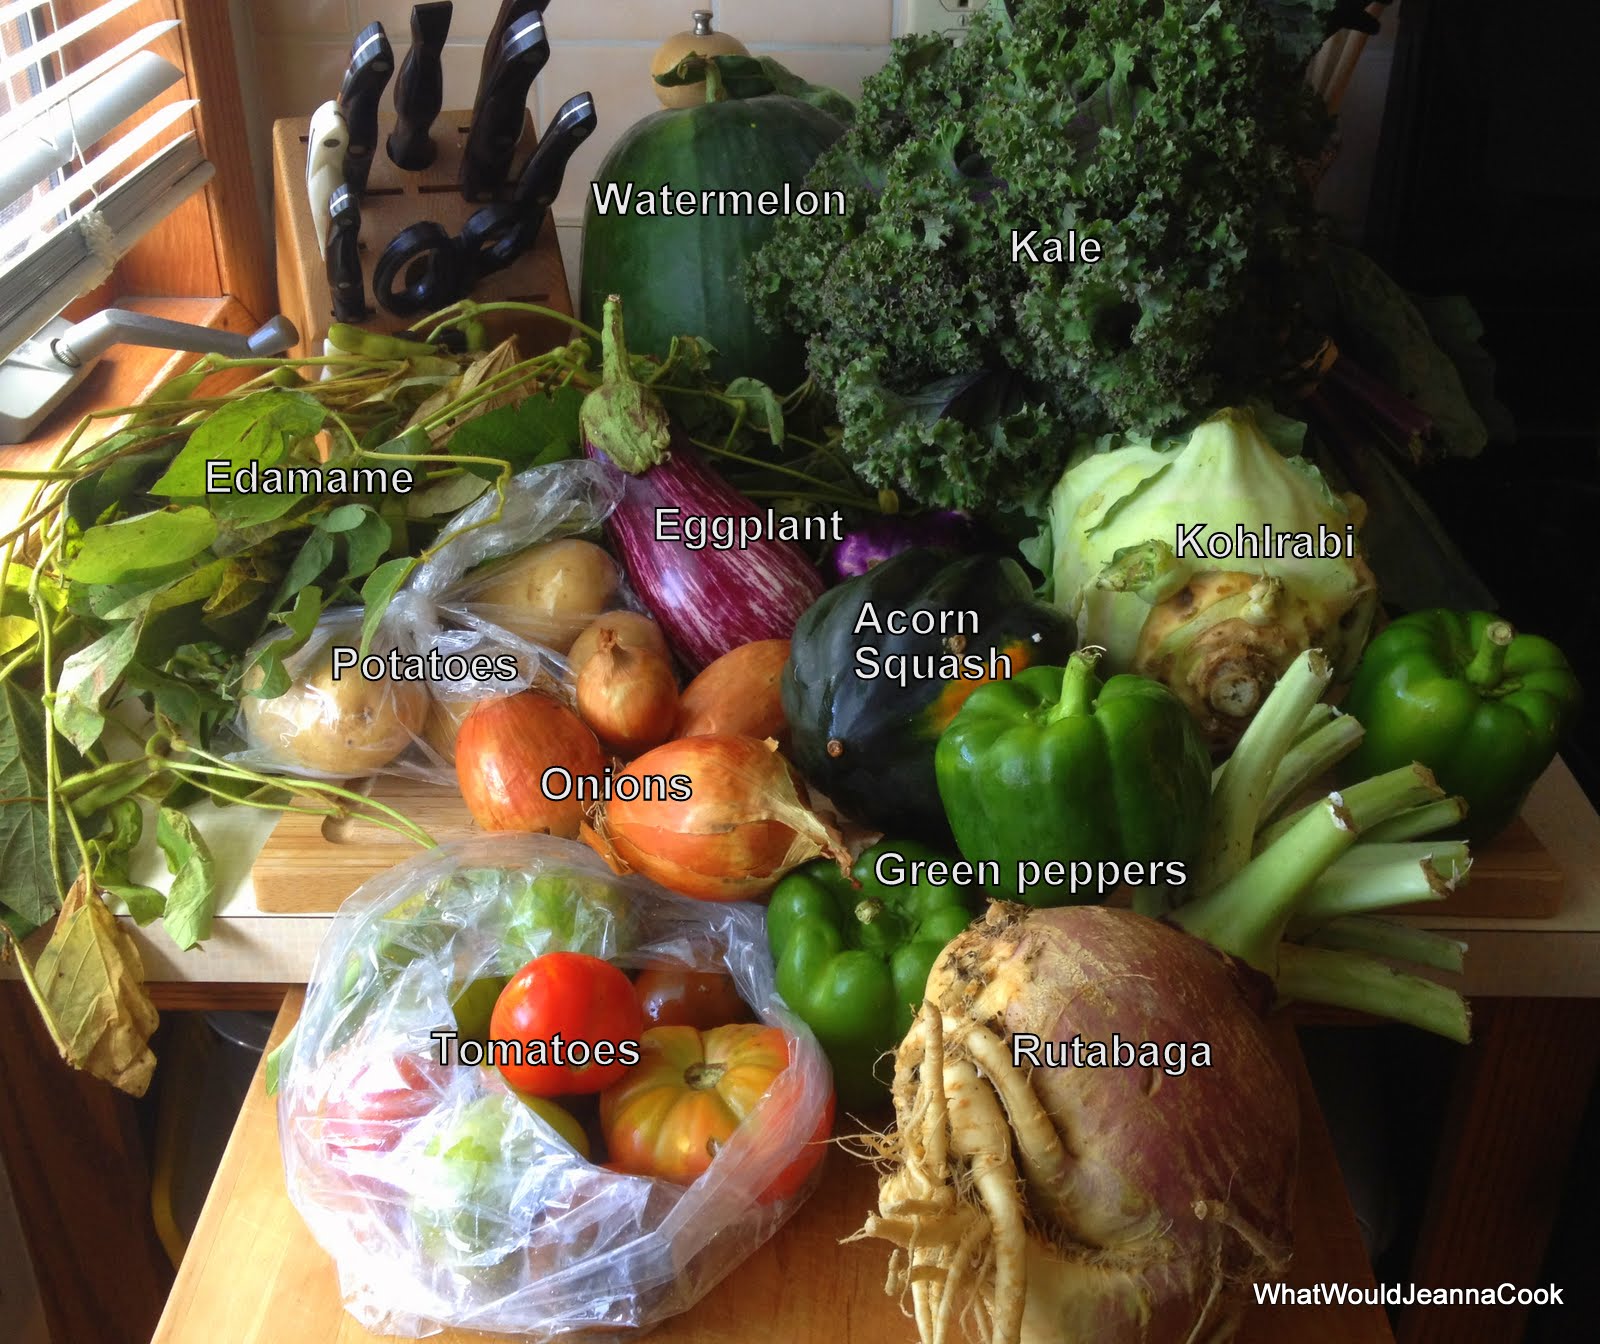
Not going to lie, as much as I love all the incredible produce we're getting twice a month, I seriously contemplated whimpering and then having a drink before dealing with our haul this week.

There's SO MUCH of it!!
One of these days I'll take my knife block off the counter before arranging the veggies.

For Week 8 we have:
  • Watermelon
  • Kale (should have had brussel sprouts but we swapped those for more greens)
  • Potatoes
  • Tomatoes
  • Kohlrabi
  • Green peppers
  • Onions
  • Edamame
  • Eggplant
  • Acorn squash
  • Rutabaga
  • Eggs (not pictured)

We are supporting LOTFOTL Farm by purchasing a Seesaw Share, plus a dozen eggs.  This means we will get a box of produce and a dozen eggs every other week. To learn more about CSA's and how to participate, visit www.localharvest.org/csa/ 
Pin It

This Week's Menu

Looks like we are finally getting a little taste of Fall over the next few days!  I'm totally taking advantage and cooking a little heavier this week.  I'm also going to continue to make the most of my meal prep time by splitting most of these meals in two so I can freeze them for later.  Since it's rather difficult (and exhausting) for me to stock my freezer in one day's meal prep, I prefer to freeze things as I go along in my usual cooking routine.

  • Thursday: Quesadillas. Either this one, or this one, or plain.  I'm keeping an eye on a friend's little boy so I need some options.  And since I stashed containers of both fillings in the freezer, it makes for a super easy meal, even with three boys running around! (I hope)
  • Friday: Our usual but with a twist.  As the pan for my breadmaker decided to turn in it's resignation (that's a story for another day), I'm picking up some Papa Murphy's instead.
  • Saturday: Thanks to a little stash of peach jam, I'm actually going to follow the original recipe for Berry Whiskey BBQ Chicken!  I think keeping the rest of the meal simple with tossed salad and fresh bread will be awesome.
  • Sunday: Meatloaf, potatoes (mashed or baked, depending on the size of the ones we get from our CSA), and some kind of CSA veggie.
  • Monday: New Recipe! I'd like to play around with Pork Chops in Apple Butter since I have a couple jars left in the basement.  I haven't quite decided on the sides yet for this as I'd like to see what my fridge and pantry offer up to me by Monday.
  • Tuesday: Leftovers
  • Wednesday: One of the "drawbacks" of using fresh bread all the time is it gets stale quickly. I don't necessarily find that a bad thing though as I just cube up what's left and toss it in a bag in the freezer.  When the bag is full, it makes things like French Toast Bake a super easy meal option!
Happy planning!!
Pin It

Wednesday, September 11, 2013

Crispy Southwest Chicken Wraps

At long last I have found the elusive pictures of this truly AMAZING wrap filling.

And when I say wrap, honestly you could use this filling for whatever you want: wraps, quesadillas, nacho topping, just plain on a spoon..... there's no judgement here!

So easy. So good!

Crispy Southwest Chicken Wraps
Recipe slightly adapted from Mel's Kitchen Cafe
Prep time: 15 minutes   Cook time: 5 minutes

1 cup cooked quinoa, warm or at room temperature
1 cup cooked, shredded chicken
1 can black beans, rinsed and drained
1 green onion, finely sliced (white and green parts)
1/4 cup fresh cilantro, chopped
Juice of 1 lime
1/2 tbsp chili powder
1 tsp ground cumin
1/2 tsp garlic salt
2 cups shredded cheese
Sour cream (optional)
6 burrito-sized flour tortillas

1.  Mix quinoa together with chili powder, cumin and garlic salt. Add remaining ingredients except for cheese and sour cream. 
Quinoa is so much like rice. But BETTER.

Admit it. You could eat this as is.


2.  Sprinkle cheese over tortillas, leaving 1/2-inch border around edges, then arrange chicken and rice mixture down the center of each tortilla. (Option: dollop little bits of sour cream over the cheese before arranging chicken mixture down the center for a creamier filling) Roll stuffed tortillas, leaving edges open and slightly flatten the wraps with the palm of your hand. Spray seam-side of the wrap lightly with cooking spray.


Special thanks to my 6 year-old for helping me with the pics of this process.


3.  Heat a large non-stick skillet (or griddle) over medium heat for 1 minute. Arrange wraps, seam-side down, in pan or griddle and cook until golden brown and crisp, about 2-3 minutes per side. Cooking them seam-side down first helps seal the long edge so they don’t fall apart. Transfer to a plate and repeat with remaining wraps. Serve warm.

Cooking seam-side down first ensures they won't open when you flip them.


I just have to say again how much I love the versatility of this recipe.  Even if you stick with using this as filling for wraps, you can still play around with it!  The recipe calls for burrito-sized tortillas, however I used smaller, taco-sized ones and thought they were perfect for small kids OR appetizers at a party.  I also found myself wishing I had the bigger ones to wrap up some extras for my freezer.  And a couple days later when it was leftover night, I was too tired to even make wraps.  But slapping the filling in between tortillas and cheese for quick quesadillas was just as good!  Sadly I think we finished this off that night so I could really test the nacho idea but rest assured I will!
Pin It

Monday, September 9, 2013

Balsamic Kale Salad

With all the kale we've been getting from our CSA lately, this one is fast becoming one of my favorite ways to prepare it.  Not just because it's fast and easy, but my husband likes it and even my two year-old shoves the dark green leaves into his mouth!


Balsamic Kale Salad
Recipe from Noelle Chave
Prep time: 2 minutes   Cook time: However long it takes your microwave to steam kale

**This is a Make Ahead salad.  You want this to sit as long as possible, up to 24 hours.

1 bunch of kale, washed and stems removed
2-3 cloves of garlic, smashed
2-4 tbsp balsamic vinegar
1-2 tbsp extra-virgin olive oil
Salt

1.  Tear or chop the kale into bite-sized pieces.  Place into a microwave-safe bowl with a splash of water.  Cover and cook for a minute or two (NOTE: I have a micro-steamer bowl and a Fresh Vegetable button on my microwave so this step is insanely easy and fast for me.  If you don't have these things, use any container and cover you have and start with a minute. You want the kale to look really bright green and be slightly wilted but still retain some crunch).
Before steaming (maybe don't pack your container quite so full)

After steaming.  LOVE that bright green color!


2.  Drain steamed kale and put in a large bowl with the smashed garlic cloves.  Douse with as much balsamic vinegar as you like and toss to coat.  Drizzle with EVOO and toss again.  Salt to taste.
Throw everything in a bowl and toss.  See? EASY


This salad is everything a leaf-y green salad should be.  It's dark, it's crunchy, the balsamic vinegar is intense but doesn't overpower the kale, and the garlic adds just enough punch too.  Honestly, I fill up at least half my plate with this "side" dish and try to make my little bit of whatever protein we're having fit around it.  I. LOVE. This. Salad!!!

And I'm pretty sure that every time I eat kale, my internal organs do a happy dance.  It's a dark, nutritionally-rich green that I love to eat as often as possible.  My family?  Not so much.  So when Rob tells me that he liked this salad I wanted to stand up and cheer.

Now, for the really important piece: do my kids like it?  Well I've already said that my two year-old pretty much inhales this.  That didn't happen the first time I made this but I've learned to be patient with my children's taste buds.  My Picky Eater of course still claims to hate this BUT I've learned his cues, and he doesn't gag on it.  That means progress!  That means that eventually he just might learn to love this as much as I do.  So this salad will just have to keep appearing on our dinner table.  Yay!!
Pin It

Thursday, September 5, 2013

This Week's Menu

My son has been back in school for two days and I. Am. LOVING IT!!!!!!!!  And the best part is, so is he.  He is a kiddo who loves to learn, and thrives on structure and routine.  So being back in school, surrounded by his friends, and challenged for seven hours a days in perfect for him.  For me also since it means I can focus even more on my little man, my home, my business, and my kitchen.

Believe me, I haven't forgotten about my kitchen!  Here's what I've got in mind for this week:

  • Thursday: Leftovers.  The amount of food I have in my fridge is staggering...
  • Saturday: New Recipe!  Polla Asado, fresh rosemary bread, and garden-fresh tomato slices (because boy are they coming in now!)
  • Sunday: With football on TV all afternoon, it's easier to just go with the flow and plan snacking as dinner.  I'm thinking some chips with salsa and queso, fresh veggies with dip, fresh fruits, maybe some meatballs or mini hot dogs in barbecue sauce.
  • Tuesday: Tator tot casserole (with some pureed broccoli "hidden" inside), and steamed green beans OR a kale salad
  • Wednesday: Leftovers. Yes, when you make big meals you too can have leftovers twice in one week and not bat an eye. ;)

Happy planning!!
Pin It

Wednesday, September 4, 2013

Zucchini Brownies

Anyone else out there becoming inundated with zucchini?  Yeah, me too.  And much as I like zucchini bread, I'm always on the look out for something new to try.


Yes, I know, this one still involves chocolate. But it's brownies!!  And honestly, these taste just as good as any box mix you'd get at the store.  And they're better for you too!

Zucchini Brownies
Recipe slightly adapted from Allrecipes.com
Prep time: 15 minutes   Cook time: 30 minutes

For the brownies:
1/4 cup canola oil
1/4 cup unsweetened applesauce
1 1/2 cups sugar
2 tsp vanilla extract
1 cup all-purpose flour
1 cup whole wheat flour
1/2 cup cocoa powder
1 1/2 tsp baking soda
1 tsp salt
2 cups shredded, fresh zucchini
1/2 cup semi-finely chopped walnuts

For the frosting:
1/4 cup butter
6 tbsp cocoa powder
2 cups confectioners sugar
1/4 cup milk
1/2 tsp vanilla extract

1.  Preheat the oven to 350.  Grease a 9x13 baking dish and set aside.

2.  For the brownies: In a large bowl, mix together the oil, sugar, and vanilla until well-blended.
It's not easy taking an interesting picture of applesauce.


3.  In a medium bowl, combine the flours, cocoa powder, baking soda and salt.  Blend into the sugar mixture. [NOTE: at the point, the batter will be very dry and will more closely resemble sandy dirt than an actual batter.  THIS IS FINE.  DO NOT ADD ANY LIQUID OR EGGS].
See what I mean?  THIS is what you're looking for: DRY


4.  Fold in the zucchini and walnuts.  Spread evenly into a prepared pan and bake 25-30 minutes; cool before frosting.
Brownies before baking.

Brownies after baking.  Notice the little dry patches?


5.  For the frosting: Melt together the butter and cocoa powder, whisking to combine.  Set aside.  In a medium bowl, blend the sugar, milk, and vanilla.  Stir in the cocoa mixture.  Spread the frosting over cooled brownies.
Frosted.  No more dryness here!


Several months ago I resolved to give up hydrogenated oils in my diet.  As a result, my beloved brownie mixes were one of the many things I nixed from my shopping trips and have been struggling to find a recipe that is as easy, fudgy, and delicious.  These brownies fit all three of those criteria AND have the added bonus of being pretty durn good for you, all things considered.

Now, I know you're probably skeptical of the moisture issue in this recipe.  But please TRUST ME on this one.  Do not add an egg unless you prefer cake-like brownies.  Do not add any water or milk.  The zucchini gives off a LOT of moisture as it is cooked and that will turn your pan of dark brown sand into this vessel of fudgy delicious-ness.

As a little aside before you dash off to your kitchen to make these, I am not normally a Frosted Brownies kinda girl however these need the frosting.  Despite all efforts to fully incorporate the zucchini, there will still be some drier patches on the top.  The frosting smooths over all that to give these a final layer of moisture to seal in all that chocolate heaven.
Pin It