Showing posts with label cream cheese. Show all posts

Wednesday, October 30, 2013

Parmesan Chicken in Cream Sauce

It's recipes like this that remind me that good food does not have to be complicated food.


Nor does it require many hours in the kitchen.  How does 20 minutes sound?

Parmesan Chicken in Cream Sauce
Recipe slightly adapted from Kraft, by way of my mother-in-law
Prep time: 5 minutes   Cook time: 15 minutes

2 tsp canola oil
1/4 cup Panko (or breadcrumbs, or cracker crumbs, or leftover oven-toasted quinoa)
2 tbsp Parmesan
4 boneless, skinless chicken breasts
Salt & freshly ground black pepper
1/3 cup chive and onion cream cheese (or another savory flavor of your choice)
1/2 cup chicken stock

1.  Preheat the oil in a large skillet over medium-high heat.
Panko is the easiest for me to keep on-hand


2.  Combine the Panko and Parmesan in a shallow dish.  Season both sides of the chicken breasts with salt & pepper.  Dredge the chicken in the Panko mixture, coating evenly.
That looks pretty even to me, don't you think?


3.  Cook the chicken in the hot oil about 5-6 minutes per side, or until cooked through (lower the heat to medium if the outside gets too brown).  Remove chicken from the skillet and keep warm on a plate.
Golden brown, crispy chicken.  *DROOOOLING*


4.  Add the cream cheese and chicken stock to the skillet and whisk to combine, gently scraping up any brown bits from the chicken.  Bring to a boil and simmer about 3 minutes until thickened.  Spoon the cream sauce over the chicken and serve!
Just cream cheese and stock; no need to get complicated.

Whisking!


I love this one.  I love this recipe for it's simplicity, it's ease, and it's versatility.  I can switch up the sauce flavors just by changing the cream cheese.  My boys can enjoy their crispy chicken un-sauced while my husband and I go for an extra spoonful or two.  AND I can have it done, ready, and on the table in less time than it takes to watch the evening news.  BONUS!!
Pin It

Tuesday, February 5, 2013

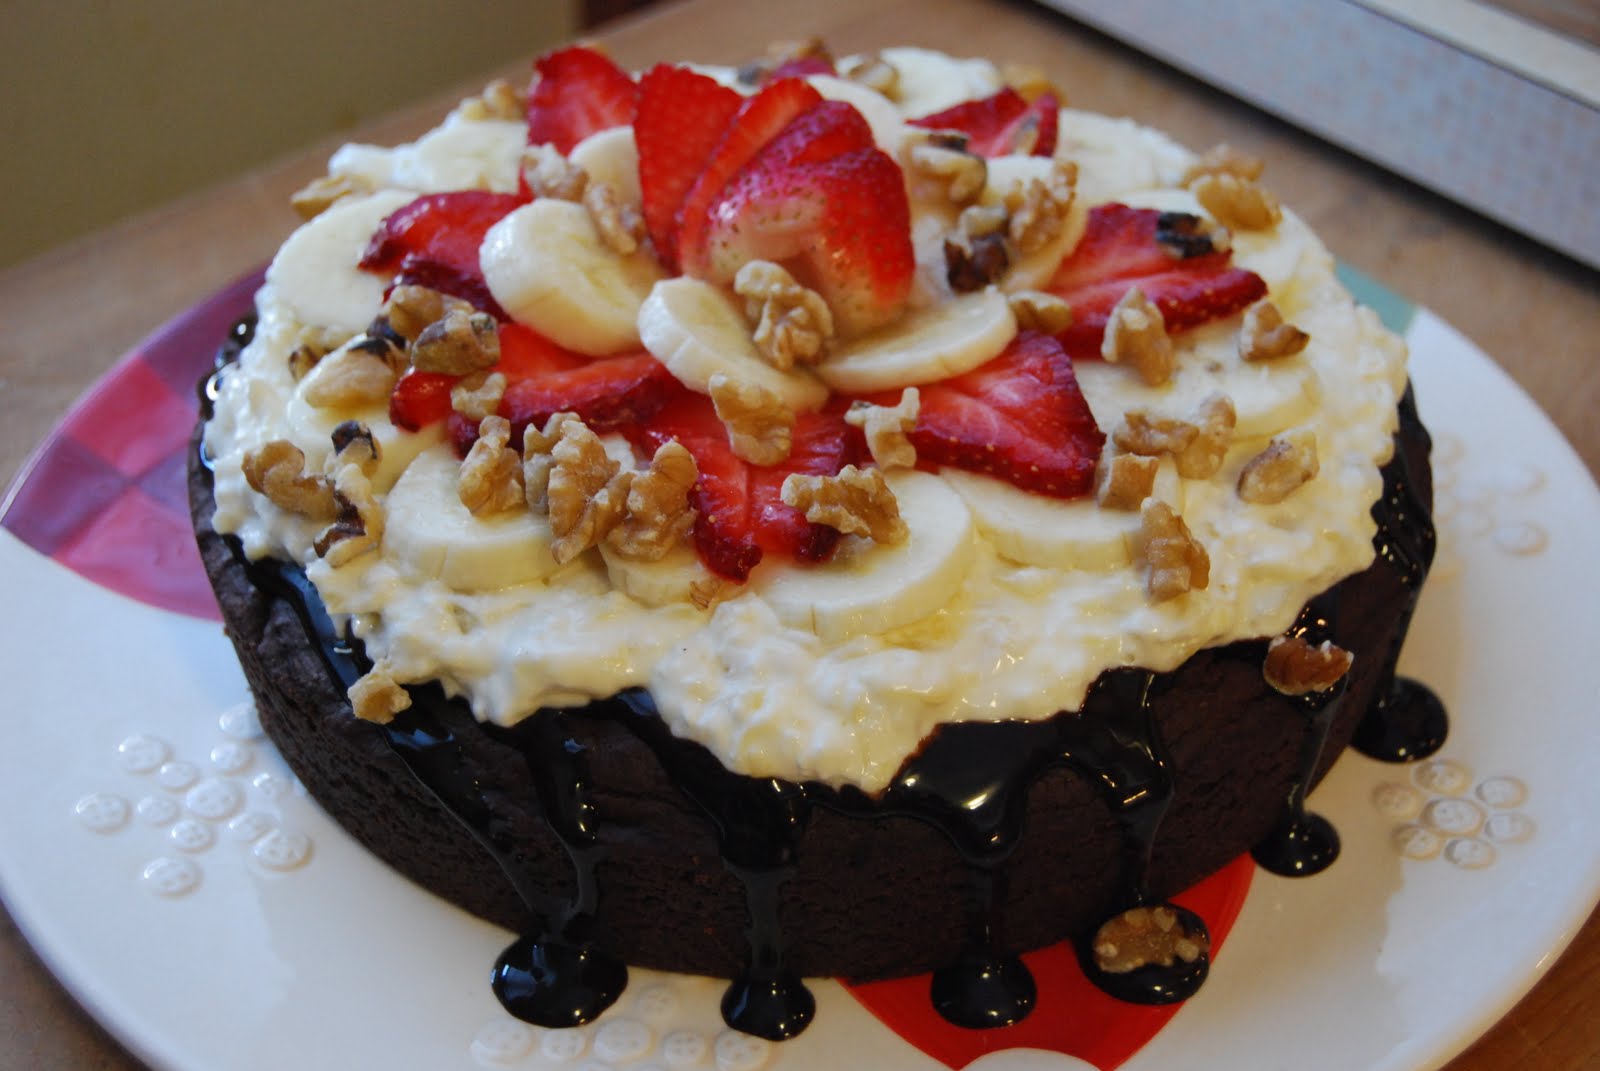
Brownie Banana Split Pizza

I'm trying to force myself to work on some other blog posts to put up here for you, and I keep coming back to this one.  I keep daydreaming about this one.  I want to keep eating this one.


So, why fight it?  I think you should share in my current dessert obsession. ;)

Brownie Banana Split Pizza
Recipe adapted from Bobby Deen
Prep time: 20 minutes   Cook time: 20-25 minutes

1/2 cup melted canola oil
1 1/4 cups flour
1/2 cup cocoa powder
2 tsp baking powder
1/4 tsp baking soda
1 tsp salt
2/3 cup honey
1/2 cup applesauce
3 tbsp chocolate syrup
4 oz whipped cream cheese
1 tbsp sugar
One 8-ounce can crushed pineapple, drained
2-3 fresh strawberries, thinly sliced
1 banana, thinly sliced and tossed in lemon juice to prevent browning
1/4 cup chopped walnuts

1.  For the brownies: Preheat the oven to 325 degrees F. Grease a 9-inch cake pan with cooking spray; set aside.
I love where this is going.


2.  Whisk together the flour, cocoa powder, baking powder, baking soda and salt in a medium bowl. Add the oil, honey, and applesauce directly into the dry ingredients. Stir until the batter is smooth.
Who wants to lick the bowl??


3.  Pour the batter into the prepared pan. Bake on the center rack until a toothpick inserted in the center comes out clean, 20-25 minutes.  Cool completely before assembling the pizza.
Keep checking the middle for done-ness! You don't want it collapsing on you.


4.  For the pizza: Remove the brownie from the cake pan and place in the middle of a cake plate.  Drizzle with chocolate sauce.
*drooooooooooooooooooooooooooool*


5.  Beat the cream cheese, sugar and pineapple together in a bowl with a spatula. Spread the mixture over the cooled brownie crust.
I could eat just this for breakfast.

Creamy. Fluffy. Lovely.


6.  Arrange the strawberry and banana slices over the cream cheese mixture. Sprinkle with the chopped walnuts. Freeze for at least 30 minutes. Slice into wedges for serving.
WARNING! Do not attempt to eat your computer screen!
This is only a picture.


Now, I was a little nervous about this recipe because of the brownie.  Obviously it's a cake-like brownie and there's not a whole lot of sweetness to it.  And it was a little dry.  But as I pulled the whole thing together, it began to make sense.  This not-so-sweet brownie is meant to complement it's sweet and fruiting toppings, not out-do them.  Between the refreshing bananas and strawberries, crunchy walnuts (my fav!!), bright and creamy cream cheese layer, and the chocolate-y base....omg can you see why my brain is still dwelling on this beauty?!
Pin It

Tuesday, November 27, 2012

Chocolate Peanut Butter Pie

I am not above bribery.  If I'm making something for dinner that I'm not sure Gavin will eat, I like to have something truly decadent for dessert to see if he'll go for it.


Behold!  Something outrageously decadent!!

Chocolate Peanut Butter Pie
Recipe from Ree Drummond
Prep time: 15 minutes   Chill time: at least 1 hour

For the crust
25 whole chocolate sandwich cookies
4 tbsp butter, melted


For the filling
1 cup peanut butter
1 (8oz) pkg softened cream cheese [psst! Use Neufchatel cheese if you're concerned about calories]
1 1/4 cups powdered sugar
1 (8oz) container Cool Whip, thawed

1.  For the crust: In a food processor, crush the chocolate sandwich cookies until they’re fine crumbs. Pour melted butter over the top and pulse until the crumbs look like moist potting soil. Press into pie pan and bake at 350 degrees for 5 to 7 minutes, or until set.  Remove from oven and allow to cool completely.
My camera didn't like the sudden BLACKNESS of the crust.


2.  For the filling: Beat the peanut butter with the cream cheese until smooth. Add powdered sugar and beat until smooth. Add in the thawed Cool Whip and beat mixture until smooth, scraping the sides as needed.
Be careful beating in the sugar that you don't cover yourself in a fine white coating.


3.  Pour filling into crust, evening out the top with a knife or spatula. Chill for at least an hour before serving.
Omg.  I could lick the screen.


Gavin likes to keep me on my toes.  As much as my Picky Eater loves sweets, if there's something on his dinner plate that he Really Doesn't Like, the absolute best I can hope for is that he'll consume his required minimum bites with as little drama as possible.  BUT, I'm getting sick of the drama.  I'm getting tired of his squeamishness over trying new flavors and textures.  So yes, you could say that I  decided to fight dirty by making a pie out of his two Most Favorite Flavors in the Entire Universe.

I don't care.  It worked!!
Pin It

Tuesday, May 29, 2012

Mini Fruit Pizzas

I'm torn about this one.  A big part of me doesn't want to tell you about this recipe.  Because I like you.  I care about you.  I want to save you from these.

But they are so delicious and so dang addictive that I just can't do it.


You HAVE to make these.  Just don't hold it against me, ok?  Ok.

Mini Fruit Pizzas
Recipe from Cooking Ala Mel

Cookie Base:
1 cup butter
1/2 cup powdered sugar
1 tbsp vanilla
1 cup chopped pecans
2 1/2 cups flour

Sweetened Cream Cheese:
1 (8oz.) pkg cream cheese
1/2 cup powdered sugar
1 tbsp vanilla

2 peeled, sliced kiwis (halved)
6-8 sliced strawberries
blueberries (about 2 or 3 per cookie base)

1.  For the cookie base: Preheat the oven to 350ºF.  

2.  Beat the butter and sugar together until light and fluffy.  Add the pecans and vanilla until fully incorporated.  Add in the flour and mix until just combined - don't overmix!  
You want this a little crumbly.

3.  Line two 12-cup muffin tins with cupcake liners.  This will make pulling the cookies out later SO MUCH EASIER.  Using a small cookie scoop, drop one scoop into each well of the pan.  Press the dough down firmly so it covers the bottom of each well evenly.  Bake for 10-12 minutes, until lightly golden.
Just use your fingers to smush it down.  Be firm.
 GET AHEAD MOMENT: Keep these in the freezer until you're ready to assemble the pizzas!

4.  For the cream cheese mixture: Blend all ingredients together until light and fluffy.  Store in a resealable plastic bag in the fridge until ready to use.  Pull out of the fridge about an hour before assembly.
Smooth. Creamy. Fluffy.  Where's my spoon?

5.  Assemble the pizzas: Snip the corner off the bag containing the cream cheese.  Squirt a dollup of cream cheese onto the cooled cookies; use the back of a spoon or a knife to spread it around.  Top each with a slice of strawberry, kiwi slice and a few blueberries. 


Whether you start making the cookies and cream cheese mixture a few days ahead of time, or the day of, you don't want to put the pizzas together until the last minute.  You want the cookie to stay nice and crisp.  Because I really packed down the cookie dough into the muffin tin, my cookies actually held up for a couple days, although toward the end the cookies were really getting soft.  

These make the most adorable addition to any party table.  I made them for Kieran's first birthday party, just to have a non-chocolate dessert alternative, and I think Gavin didn't even try the cupcakes.  He just kept going back for more fruit pizza!  And he wasn't the only one either... These were such a big hit!

Ok so I am totally going to reiterate the original poster's disclaimer about this recipe... Just because this dessert involves fruit, it should IN NO WAY be considered a healthy alternative.  Go back up to the list of ingredients for the cookie base.  That first item there is BUTTER.  An entire cup of BUTTER.  There's also CREAM CHEESE (I wouldn't recommend using lowfat or Neufchatel here; you want that fat for creaminess).  And SUGAR.  A couple blueberries and a quarter slice of kiwi will not combat the effects of the more fattening ingredients here.  
Pin It